How to define custom workflows
What you will learn
- Connect NOMAD entries into a directed graph structure
- Create hierarchical workflow graphs
- Link task nodes to supported and custom entries (e.g., ELN entries)
- Link inputs and outputs to annotated files
- Navigate workflows using NOMAD's interactive workflow graphs
Recommended preparation
- Basic knowledge of NOMAD Organization + MetaInfo: Explanation > From files to data, Explanation > Data structure
Further resources
Overview
In NOMAD, Workflows are directed graphs with nodes (tasks) that connect multiple Entries together in a structured way, while specifying information passed between the nodes via inputs/outputs that link to particular sections of the relevant Archive.
Workflows are sometimes created automatically by NOMAD during Processing, for certain supported uploads. Users can also create their own workflow entries by uploading an appropriately formatted workflow YAML. This how-to guide will cover the specifics of this process.
Note
In the following, various supported raw data files will be used to form concrete examples that can be reproduced. The nature of these files or their underlying methods of production is irrelevant for the purpose of this how-to.
Simple workflows with supported tasks
We start with the simplest possible workflow structure—a single task with one input and one output:
graph LR;
    A((Input structure)) --> B[DFT];
    B[DFT] --> C([Output calculation]);
The file associated with this task, dft.xml, is a standard DFT calculation that is supported by NOMAD's simulation parsers, i.e., upon upload it will be automatically recognized and parsed to create an entry. Actually, the parser for this file will automically create a "Single Point" workflow within the same entry, which specifies the standard input and outputs for simulation data in NOMAD:
Here, we will reproduce, and customize, this workflow graph in a separate entry, using the YAML-based approach.
To define the initial workflow, create a file dft.workflow.archive.yaml with the following content:
workflow2:
  name: DFT SinglePoint
  inputs:
    - name: Input system
      section: '../upload/archive/mainfile/dft.xml#/run/0/system/-1'
  outputs:
    - name: Output calculation
      section: '../upload/archive/mainfile/dft.xml#/run/0/calculation/-1'
  tasks:
    - m_def: nomad.datamodel.metainfo.workflow.TaskReference
      task: '../upload/archive/mainfile/dft.xml#/workflow2'
      name: DFT
      inputs:
        - name: Input structure
          section: '../upload/archive/mainfile/dft.xml#/run/0/system/-1'
      outputs:
        - name: Output calculation
          section: '../upload/archive/mainfile/dft.xml#/run/0/calculation/-1'
Important
For the creation of workflow entries using YAMLs, the file must have the extension archive.yaml.
This file is constructed according to NOMAD's schemas for Archive Files and General Workflows. The workflow2 section of the archive has 3 possible subsections: inputs, outputs, and tasks:
inputs: a list of references to the global inputs of the workflow, with name and section attributes. section corresponds to a path for linking to the relevant archive section. In this case, the relative section path is run[0].system[-1], linked to the entry defined by the mainfile dft.xml. The prefix is discussed under Considerations for archive path specification.
outputs: identical to the inputs list, representing the global outputs of the workflow, with the relative section path run[0].calculation[-1] in this case.
tasks: a list of references to the tasks/steps of the workflow. Each task contains m_def, task, inputs, and outputs attributes. inputs/outputs are task-specific versions of the lists defined above.
task is the path for linking to the relevant archive section, analogous to the section attribute for inputs/outputs. However, this path must reference a task, which in all practical cases corresponds to a workflow2 section
m_def defines the type of task according to NOMAD's MetaInfo schema, in this case a TaskReference to the archive workflow2 section. The use of TaskReference will be clarified in the Nested workflows > In multiple entries example below.
Considerations for archive path specification:
-
In general, the archive path can be represented as
<prefix>/<entry identifier>/<relative archive path>(see also How to write a YAML schema package > Different forms of references). -
The prefix for the archive path is given by: 1.
../upload/archive/mainfilefor entries that are contained within the same upload as the workflow YAML, or 2.../uploads/<upload_id>/archive/for entries contained in distinct uploads as the workflow YAML, where<upload_id>is a placeholders for the upload id, which can be obtained from the Overview page of any entry. -
The entry identifier is
<entry_id>#(placeholder for the entry id, also found on the Overview page) for case 1 of the previous bullet, and<path to mainfile>/<mainfile name>#for case 2.<path to mainfile>is the path from the root of the original upload directory structure. -
The relative archive path is the relative path to the archive section to be linked. The archive structure can be investigated using NOMAD's MetaInfo Browser.
With a basic understanding in hand, you can now download the example data and upload the obtained .zip file to NOMAD:
The download simple_workflow.zip should have the following structure:
Upon upload to NOMAD, the above zip will produce 2 entries:
-
A single point entry with mainfile
dft.xml -
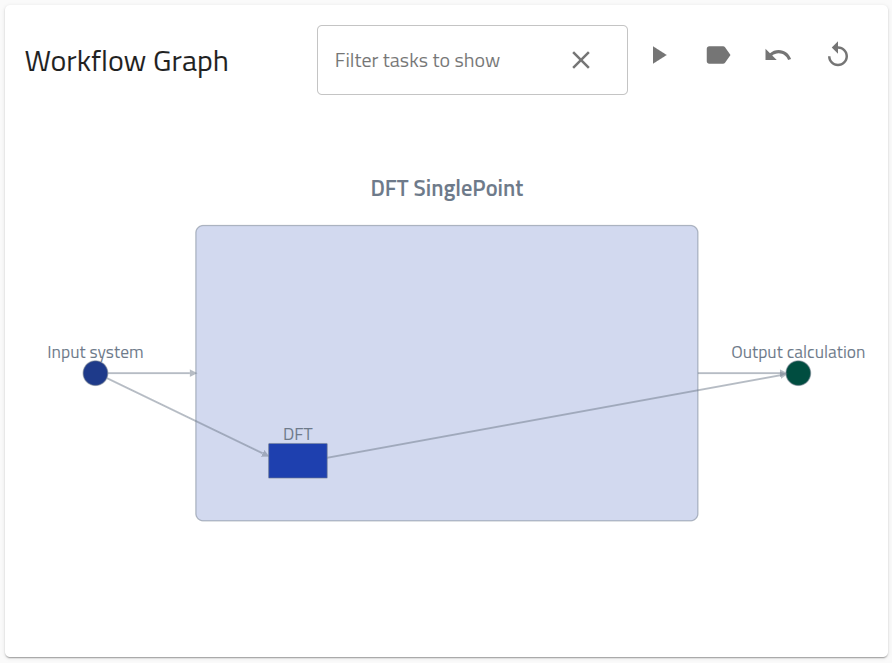
a workflow entry with mainfile
dft.workflow.archive.yaml. The workflow entry will contain the following workflow graph on the Overview page:
Adding more workflow metadata
You could extend the workflow metadata by adding the metholodogical input parameters. These are stored in the archive with path run[0].method[-1]. The new single_point.archive.yaml will then be:
workflow2:
  name: DFT SinglePoint
  inputs:
    - name: Input system
      section: '../upload/archive/mainfile/dft.xml#/run/0/system/-1'
    - name: Input methodology parameters
      section: '../upload/archive/mainfile/pressure1/dft_p1.xml#/run/0/method/-1'
  outputs:
    - name: Output calculation
      section: '../upload/archive/mainfile/dft.xml#/run/0/calculation/-1'
  tasks:
    - m_def: nomad.datamodel.metainfo.workflow.TaskReference
      task: '../upload/archive/mainfile/dft.xml#/workflow2'
      name: DFT
      inputs:
        - name: Input structure
          section: '../upload/archive/mainfile/dft.xml#/run/0/system/-1'
        - name: Input methodology parameters
          section: '../upload/archive/mainfile/dft.xml#/run/0/method/-1'
      outputs:
        - name: Output calculation
          section: '../upload/archive/mainfile/dft.xml#/run/0/calculation/-1'
When uploaded with dft.xml as before, this will generate a similar workflow graph, but with an extra input node.
Referencing Tasks in different uploads
As already mentioned under Considerations for archive path specification, your workflow YAML can reference entries that you have previously uploaded to NOMAD. In this case, you should replace the path prefix ../upload/archive/mainfile/<mainfile_name> with ../uploads/<upload_id>/archive/<entry_id>.
Corresponding dft.workflow.archive.yaml from above example
workflow2:
  name: DFT SinglePoint
  inputs:
    - name: Input system
      section: '../upload/<upload_id>/archive/<entry_id>#/run/0/system/-1'
  outputs:
    - name: Output calculation
      section: '../upload/<upload_id>/archive/<entry_id>#/run/0/calculation/-1'
  tasks:
    - m_def: nomad.datamodel.metainfo.workflow.TaskReference
      task: '../upload/<upload_id>/archive/<entry_id>#/workflow2'
      name: DFT
      inputs:
        - name: Input structure
          section: '../upload/<upload_id>/archive/<entry_id>#/run/0/system/-1'
      outputs:
        - name: Output calculation
          section: '../upload/<upload_id>/archive/<entry_id>#/run/0/calculation/-1'
Nested workflows
Nested, or hierarchical, workflows correspond to workflow graphs containing task nodes that themselves can be represented as a directed graph, i.e., a sub-workflow. The General Workflow Schema allows for nested workflows through an inheritance relationship from the Task class to the Workflow class.
In multiple entries
The most common way to construct a nested workflow is by creating separate entries for each (sub-)workflow. In this case, each sub-workflow archive will contain a populated workflow2 section. Thus, to add a sub-workflow to your workflow YAML, the best practice is to directly link to this workflow2 section, i.e., task: <prefix>/<entry identifier>/workflow2.
Important
When task is linked to a workflow2 section of a different upload, this sub-workflow task must be defined as a TaskReference by setting m_def: nomad.datamodel.metainfo.workflow.TaskReference. This is necessary to overwrite the default class for workflow2.task, nomad.datamodel.metainfo.workflow.Task, which is only allowed to contain a Task instance directly, but not allowed to reference one (see General Workflow Schema).
We have already seen this case in Simple Workflows with Support Tasks. Actually, there is a convention in NOMAD that all simulation entries contain a workflow representation, even for single-step workflows. Thus, any workflow containing simulation tasks will be a nested workflow.
In a single entry
Since a Workflow instance is also a Task instance due to inheritance, we can directly nest workflows within a single entry. Here we illustrate the concept using a concrete computational workflow, represented schematically as:
graph LR;
    A2((Inputs)) --> B2[DFT];
    B2 --> C2[TB];
    C2 --> D21[DMFT at T1];
    C2 --> D22[DMFT at T2];

    subgraph DMFT
        D21;
        D22;
    end

    D21 --> E21([Output calculation T1])
    D22 --> E22([Output calculation T2])
This workflow contains a series of electronic structure calculations: a DFT and a TB calculation performed in serial, followed by two DMFT calculations performed in parallel at two different temperatures. The DMFT workflow task is considered as a sub-workflow.
The mainfiles for these calculations are organized in the following file structure, stored with nested_workflow_one-entry.zip:
.
├── DFT
│   └── dft.xml
├── TB
│   ├── tb.wout
│   └── ...extra auxiliary files
├── DMFT
    ├── T1
    │    └── dmft_t1.hdf5
    └── T2
        └── dmft_t2.hdf5
We construct the YAML, nested_workflow_one-entry.archive.yaml in parts for clarity:
The overall workflow2 section and global workflow inputs:
workflow2:
  name: DFT+TB+DMFT
  inputs:
    - name: Input structure
      section: '../upload/archive/mainfile/DFT/dft.xml#/run/0/system/-1'
The global workflow outputs outputs:
  outputs:
    - name: Output DMFT at T1 calculation
      section: '../upload/archive/mainfile/DMFT/T1/dmft_t1.hdf5#/run/0/calculation/-1'
    - name: Output DMFT at T2 calculation
      section: '../upload/archive/mainfile/DMFT/T2/dmft_t2.hdf5#/run/0/calculation/-1'
The workflow tasks:
  tasks:
    - m_def: nomad.datamodel.metainfo.workflow.TaskReference
      task: '../upload/archive/mainfile/DFT/dft.xml#/workflow2'
      name: DFT
      inputs:
        - name: Input structure
          section: '../upload/archive/mainfile/DFT/dft.xml#/run/0/system/-1'
      outputs:
        - name: Output DFT calculation
          section: '../upload/archive/mainfile/DFT/dft.xml#/run/0/calculation/-1'
    - m_def: nomad.datamodel.metainfo.workflow.TaskReference
      task: '../upload/archive/mainfile/TB/tb.wout#/workflow2'
      name: TB
      inputs:
        - name: Input DFT calculation
          section: '../upload/archive/mainfile/DFT/dft.xml#/run/0/calculation/-1'
      outputs:
        - name: Output TB calculation
          section: '../upload/archive/mainfile/TB/tb.wout#/run/0/calculation/-1'
    - m_def: nomad.datamodel.metainfo.workflow.Workflow
      name: DMFT
      inputs:
        - name: input TB calculation
          section: '../upload/archive/mainfile/TB/tb.wout#/run/0/calculation/-1'
      outputs:
        - name: Output DMFT at T1 calculation
          section: '../upload/archive/mainfile/DMFT/T1/dmft_t1.hdf5#/run/0/calculation/-1'
        - name: Output DMFT at T2 calculation
          section: '../upload/archive/mainfile/DMFT/T2/dmft_t2.hdf5#/run/0/calculation/-1'
      tasks:
        - m_def: nomad.datamodel.metainfo.workflow.TaskReference
          task: '../upload/archive/mainfile/DMFT/T1/dmft_t1.hdf5#/workflow2'
          name: DMFT at T1
          inputs:
            - name: Input TB calculation
              section: '../upload/archive/mainfile/TB/tb.wout#/run/0/calculation/-1'
          outputs:
            - name: Output DMFT at T1 calculation
              section: '../upload/archive/mainfile/DMFT/T1/dmft_t1.hdf5#/run/0/calculation/-1'
        - m_def: nomad.datamodel.metainfo.workflow.TaskReference
          task: '../upload/archive/mainfile/DMFT/T1/dmft_t1.hdf5#/workflow2'
          name: DMFT at T2
          inputs:
            - name: Input TB calculation
              section: '../upload/archive/mainfile/TB/tb.wout#/run/0/calculation/-1'
          outputs:
            - name: Output DMFT at T2 calculation
              section: '../upload/archive/mainfile/DMFT/T2/dmft_t2.hdf5#/run/0/calculation/-1'
Most importantly for this example: In contrast to Nested workflows > In multiple files, where TaskReference was used to define sub-workflows, the task named DMFT is defined directly as type Workflow.
When uploaded with the example data, this workflow file will produce an entry with the following nested workflow graph on the Overview page:
You can reproduce this example by downloading the example data (with workflow YAML included at the root level), and uploading to NOMAD yourself:
Download nested_workflow_one-entry.zip
Workflows with custom tasks
custom tasks: defined here as tasks for which the corresponding raw files are not automatically recognized by NOMAD, or perhaps there are no raw files at all for the task.
The easiest way to create entries for a custom task is to use one of NOMAD's built-in ELN schemas. ELN entries can be created from these schema using the user interface: How to > Manage > Create a basic ELN entry.
Creating an ELN entry from YAML
Analogous to the simulation code parsers, NOMAD has a parser for its native schema — the NOMAD MetaInfo. This parser is automatically executed for files named <file_name>.archive.yaml (see the Note under Explanation > From files to data > Parsing). Actually, this is exactly the functionality that we are using to upload our workflows.
In this way, users can also create ELN entries, by uploading a YAML file populated according to one of NOMAD's ELN built-in schemas. For example, we can create a basic ELN entry by creating and uploading a file, e.g. basic_eln_entry.archive.yaml, with the contents:
data:
  m_def: "nomad.datamodel.metainfo.eln.ElnBaseSection"
  name: "ELN entry from YAML"
  description: "A test ELN entry..."
The data section is created and defined as type ElnBaseSection, meaning that we can populate all the quantities (e.g., name and description) living in this section (as seen in MetaInfo Browser > ELNBaseSection).
Uploading this yaml to the test deployment results in an entry with the overview page:
The ELNFileManager
ELNFileManager is a built-in schema for referencing and annotating files within an ELN entry. You can create an ELNFileManager either from the GUI or via the YAML approach, in the same ways as described above.
For example:
create_force_field.archive.yaml
data:
  m_def: 'nomad.datamodel.metainfo.eln.ElnFileManager'
  name: 'Create force field'
  description: 'The force field is defined for input to the MD simulation engine.'
  Files:
  - file: 'water.top'
    description: 'The force field file for simulation input.'
Uploading to NOMAD with an empty dummy file called water.top should result in the following entry display:
Example workflow with ELN tasks
For a concrete example, consider the following workflow consisting of 3 tasks for setting up a molecular dynamics simulation. Each task has as input some parameters and an execution script, and outputs some file:
Use the ELNFileManager class to create entries for each task, as well as for the workflow parameters and execution scripts:
create_force_field.archive.yaml
create_box.archive.yaml
insert_water.archive.yaml
workflow_parameters.archive.yaml
workflow_scripts.archive.yaml
data:
  m_def: 'nomad.datamodel.metainfo.eln.ElnFileManager'
  name: 'Workflow Scripts'
  description: 'All the scripts run during setup of the MD simulation.'
  Files:
  - file: 'Custom_ELN_Entries/workflow_script_1.py'
    description: 'Creates the simulation box and inserts water molecules.'
  - file: 'Custom_ELN_Entries/workflow_script_2.py'
    description: 'Creates the appropriate force field files for the simulation engine.'
Now we construct the workflow YAML, setup_workflow.archive.yaml, as in the examples above:
setup_workflow.archive.yaml
"workflow2":
  "name": "MD Setup workflow"
  "inputs":
  - "name": "workflow parameters"
      "section": "../upload/archive/mainfile/Custom_ELN_Entries/workflow_parameters.archive.yaml#/data"
  - "name": "workflow scripts"
      "section": "../upload/archive/mainfile/Custom_ELN_Entries/workflow_scripts.archive.yaml#/data/Files"
  "outputs":
  - "name": "structure file"
      "section": "../upload/archive/mainfile/Custom_ELN_Entries/insert_water.archive.yaml#/data/Files/0/file"
  - "name": "force field file"
      "section": "../upload/archive/mainfile/Custom_ELN_Entries/create_force_field.archive.yaml#/data/Files/0/file"
  "tasks":
  - "m_def": "nomad.datamodel.metainfo.workflow.TaskReference"
      "name": "create box"
      "task": "../upload/archive/mainfile/Custom_ELN_Entries/create_box.archive.yaml#/data"
      "inputs":
      - "name": "workflow parameters"
      "section": "../upload/archive/mainfile/Custom_ELN_Entries/workflow_parameters.archive.yaml#/data"
      - "name": "workflow script 1"
      "section": "../upload/archive/mainfile/Custom_ELN_Entries/workflow_scripts.archive.yaml#/data/Files/0/file"
      "outputs":
      - "name": "initial box"
      "section": "../upload/archive/mainfile/Custom_ELN_Entries/create_box.archive.yaml#/data/Files/0/file"
  - "m_def": "nomad.datamodel.metainfo.workflow.TaskReference"
      "name": "insert water"
      "task": "../upload/archive/mainfile/Custom_ELN_Entries/insert_water.archive.yaml#/data"
      "inputs":
      - "name": "initial box"
      "section": "../upload/archive/mainfile/Custom_ELN_Entries/create_box.archive.yaml#/data/Files/0/file"
      - "name": "workflow script 1"
      "section": "../upload/archive/mainfile/Custom_ELN_Entries/workflow_scripts.archive.yaml#/data/Files/0/file"
      "outputs":
      - "name": "structure file"
      "section": "../upload/archive/mainfile/Custom_ELN_Entries/insert_water.archive.yaml#/data/Files/0/file"
  - "m_def": "nomad.datamodel.metainfo.workflow.TaskReference"
      "name": "create force field"
      "task": "../upload/archive/mainfile/Custom_ELN_Entries/create_force_field.archive.yaml#/data"
      "inputs":
      - "name": "workflow parameters"
      "section": "../upload/archive/mainfile/Custom_ELN_Entries/workflow_parameters.archive.yaml#/data"
      - "name": "workflow script 2"
      "section": "../upload/archive/mainfile/Custom_ELN_Entries/workflow_scripts.archive.yaml#/data/Files/1/file"
      "outputs":
      - "name": "force field file"
      "section": "../upload/archive/mainfile/Custom_ELN_Entries/create_force_field.archive.yaml#/data/Files/0/file"
To reproduce the workflow shown in the video above, download the example files, entry YAMLs, and workflow YAML defined above, and upload them to NOMAD:
Download Custom_ELN_Entries.zip
Referencing ELN entries created with the GUI
To reference ELN entries created using the NOMAD GUI, use the upload and entry ids for the archive path specification, as detailed in Referencing Tasks in Different Uploads above.
Creating workflow graphs with the GUI using the ELN interface
Warning
Coming soon ...
Using the workflow visualizer
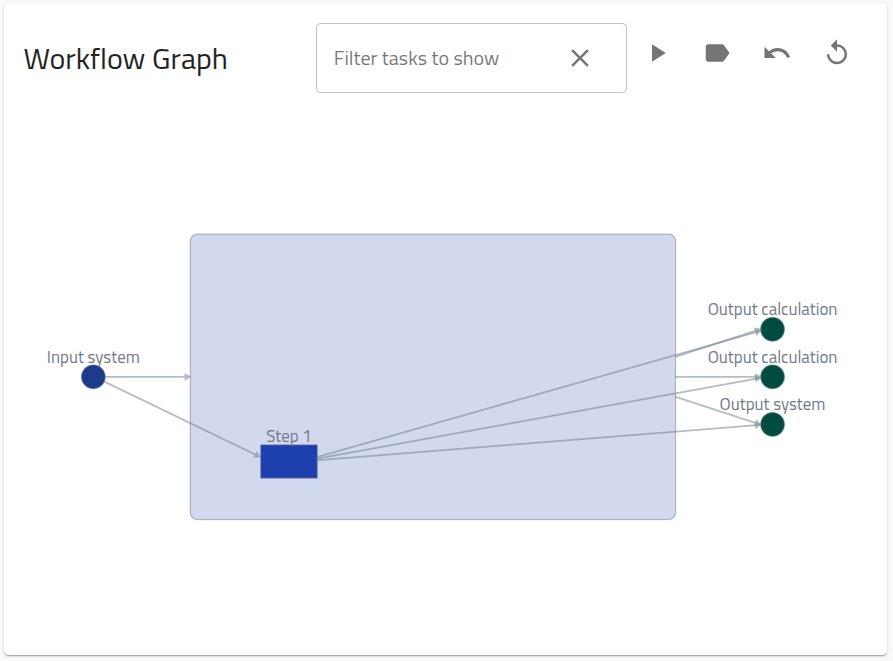
As we have seen above, when a workflow is defined within an entry, The Overview page will show an interactive graph of the workflow2 section defined.
The following video demonstrates the basic navigation functionalities of these interactive workflow graphs:
The nodes (inputs, tasks and outputs) are shown from left to right for the current workflow layer. The edges (arrows) from (to) a node denotes an input (output) to a section in the target node. One can see the description for the nodes and edges by hovering over them. When the inputs and outputs are clicked, the linked section is shown in the archive browser. By clicking on a task, the graph zooms into the nested workflow layer. By clicking on the arrows, only the relevant linked nodes are shown. One can go back to the previous view by clicking on the current workflow node.
A number of controls are also provided on top of the graph. The first enables a filtering
of the nodes following a python-like syntax i.e., list (comma-separated) or range (colon-separated).
Negative index and percent are also supported. By default, the task nodes can be filtered
but can be changed to inputs or outputs by clicking on one of the respective nodes. By clicking
on the play button, a force-directed layout of the task nodes is enabled. The other tools
enable to toggle the legend, go back to a previous view and reset the view.
You can also use the graph to navigate to the referenced data, by clicking the labels above any task node or input/output, as shown in the following video:
Once you leave the workflow entry, you can use either the browser back button or, more generally, the "Entry References" section of the Overview page to navigate back to the workflow entry:
Warning
Illustrative video coming soon ...
Proper creation of workflow entries
To ensure that the workflow visualizer functions correctly:
- To create a graph edge, at least one
inputof the in-node must match exactly anoutputof the out-node.
Advanced Topics
Instantiating a workflow from YAML using a standardized workflow class
Warning
Coming soon ...
Extending the workflow schema
The abstract workflow schema above allows us to build generalized tools for workflows, like workflow searches, navigation in workflow, graphical representations of workflows, etc. But, you can still augment the given section definitions with more information through inheritance. These information can be specialized references to denote inputs and outputs, can be additional workflow or task parameters, and much more.
In this example, we created a special workflow section definition GeometryOptimization
that defines a parameter threshold and an additional reference to the final
calculation of the optimization:
definitions:
  sections:
    GeometryOptimizationWorkflow:
      base_section: nomad.datamodel.metainfo.workflow.Workflow
      quantities:
        threshold:
          type: float
          unit: eV
        final_calculation:
          type: runschema.calculation.Calculation

workflow2:
  m_def: GeometryOptimizationWorkflow
  final_calculation: '#/run/0/calculation/-1'
  threshold: 0.029
  name: GeometryOpt
  inputs:
    ...