Create a custom ELN schema in NOMAD using YAML
In this tutorial, we create a custom ELN using a YAML-based schema file to structure experimental data in NOMAD. We follow a step-by-step workflow to define sections, quantities, and annotations that shape how the experiment is represented in the GUI. By the end of the tutorial, we will have a functional custom ELN schema that can be uploaded and tested in NOMAD.
What you will learn
In this tutorial, you will learn how to:
- Create a custom ELN schema package using a
.archive.yamlfile - Define sections and quantities in a NOMAD schema
- Reuse existing data models by inheriting from NOMAD base sections
- Configure ELN input fields using annotations
- Structure an ELN template using nested subsections
- Use a custom ELN schema package in NOMAD as a template to document experiments in NOMAD
Before you begin
This tutorial does not require prior experience with creating custom schemas. However, familiarity with the NOMAD ELN functionality is helpful.
Before starting, make sure you have:
-
NOMAD user account
Creating and editing ELN entries requires a NOMAD user account.
You can create an account by following the steps described in the overview page. -
Basic understanding of uploads and entries
Familiarity with uploads and entries, and how they relate to each other can be helpful. These concepts are introduced in the section key elements in NOMAD. -
Basic familiarity with YAML configuration files
This tutorial uses YAML to define the structure of a custom ELN schema. Prior experience with YAML syntax and indentation is helpful, but deep knowledge of YAML is not required. -
A YAML-capable editor or IDE (e.g., VS Code)
You will edit a YAML file during the tutorial. Using an editor or IDE with YAML support (for example, VS Code) is recommended. -
Optional: familiarity with key NOMAD schema concepts
It may be helpful to review the following concepts:
About the example experiment used in this tutorial
In this tutorial, we use an example experiment involving the solution processing of polymer thin films to illustrate how experimental metadata can be structured in a custom ELN schema.
The experiment is represented by general contextual metadata, including its name, the responsible researcher, the date, and free-text notes.
In addition, the schema captures:
- Information about the sample involved in the experiment.
- Details of the polymer solution, including its concentration and composition.
- The substances used to prepare the solution, together with the corresponding mass and volume.
- A high-level description of the processing step.
These elements mirror the structure that you will implement in the YAML schema and demonstrate how experimental metadata, materials, and preparation steps can be organized in a structured and reusable way.
Step 1: Create the schema file
Create a new file named polymer_processing.archive.yaml in a local working directory. This file will contain the custom ELN schema definitions for the example experiment in this tutorial.
The .archive.yaml extension is needed
NOMAD recognizes files with the .archive.yaml extension as schema packages, meaning they can contain one or more section and quantity definitions.
Step 2: Declare the schema package
Open polymer_processing.archive.yaml and add the following content:
-
definitions:declares a schema package and contains the metadata of your schema such as its name and the sections it contains. -
name:provides a human-readable identifier for the package. -
sections:inroduces a block where the sections of your ELN schema will be defined.
Note that name: and sections: must be indented one level (two spaces) with respect to definitions:.
YAML indentation matters
YAML uses indentation to define hierarchical structure. Indent by two spaces for each level.
If NOMAD reports a YAML error, check that keys at the same level align.
At this point, the file declares an empty schema package that can now be extended with section definitions.
Step 3: Add a main experiment section
A schema must contain at least one section. Here, you will define a section called Experiment_Information that will represent the experiment entry and hold all related metadata.
To ensure that this section is treated as a valid entry that is compatible with NOMAD's data model, inherit from the base section nomad.datamodel.data.EntryData, using base_sections:.
Add the following content to the schema file:
Where to paste: under sections: and indented one level (two spaces) with respect to it.
Note that base_sections: must be indented one level (two spaces) with respect to Experiment_Information:, and will include an indented list for the base sections to inherit from.
Checkpoint 1
Your file so far (after step 3) should look like the following:
definitions:
  name: Processing of polymers thin-films
  sections:
    Experiment_Information:
      base_sections:
        - nomad.datamodel.data.EntryData
How to read it: so far, this .archive.yaml file defines a NOMAD schema package which has a definition. The schema package's definitions tells, it has a name and defines sections. The section Experiment_Information inherits from NOMAD base sections (using the base_sections: key). The one here is nomad.datamodel.data.EntryData.
Step 4: Add quantities to the main section
Quantities define the individual data fields that will be stored for each experiment entry. They are added using quantities:.
Define the quantities Name, Researcher, Date and Additional_Notes, by adding the following content to the schema file:
quantities:
Name:
type: str
default: Experiment title
Researcher:
type: str
default: Name of the researcher who performed the experiment
Date:
type: Datetime
Additional_Notes:
type: str
Where to paste: under Experiment_Information and indented one level (two spaces) with respect to it, i.e., quantities: aligns with base_sections:.
-
Each quantity is defined by a name (for example,
NameorDate). -
type:specifies the data type. -
default:provides a placeholder value (optional). -
If a quantity represents a physical value, you can also add a
unitkey.
Checkpoint 2
Your file so far (after step 4) should look like the following:
definitions:
  name: Processing of polymers thin-films
  sections:
    Experiment_Information:
      base_sections:
        - nomad.datamodel.data.EntryData
      quantities:
        Name:
          type: str
          default: Experiment title
        Researcher:
          type: str
          default: Name of the researcher who performed the experiment
        Date:
          type: Datetime
        Additional_Notes:
          type: str
Step 5: Turn quantities into ELN fields
So far, you have defined the data structure of your schema.
Next, you will configure how these quantities are displayed and edited in the NOMAD ELN interface.
To do this, add an m_annotations: block to each quantity.
Start with updating the Name quantity as follows:
-
m_annotations:adds additional behavior to a section or quantity. -
eln:declares that the quantity is editable in the ELN interface. -
component: StringEditQuantitydefines that the input format for this quantity is a short text field.
Note that as m_annotations: is used to configure the Name quantity, it is indented one level (two spaces) with respect to Name:, i.e., it aligns with type: and default: in the Name block.
NOMAD's editable ELN components
For a list of editable components in NOMAD, see editable quantities.
Now update the remaining quantities:
-
Use
StringEditQuantityforResearcher -
Use
DateTimeEditQuantityforDate -
Use
RichTextEditQuantityforAdditional_Notes
After completing this step, your schema defines both structure and GUI behavior for the main experiment fields.
Checkpoint 3 - Test your schema in NOMAD
This is the complete polymer_processing.archive.yaml file up to this point. Use it as a checkpoint to compare against your file.
definitions:
name: Processing of polymers thin-films
sections:
Experiment_Information:
base_sections:
- nomad.datamodel.data.EntryData
quantities:
        Name:
          type: str
          default: Experiment title
          m_annotations:
            eln:
              component: StringEditQuantity
Researcher:
type: str
default: Name of the researcher who performed the experiment
m_annotations:
eln:
component: StringEditQuantity
Date:
type: Datetime
m_annotations:
eln:
component: DateTimeEditQuantity
Additional_Notes:
type: str
m_annotations:
eln:
component: RichTextEditQuantity
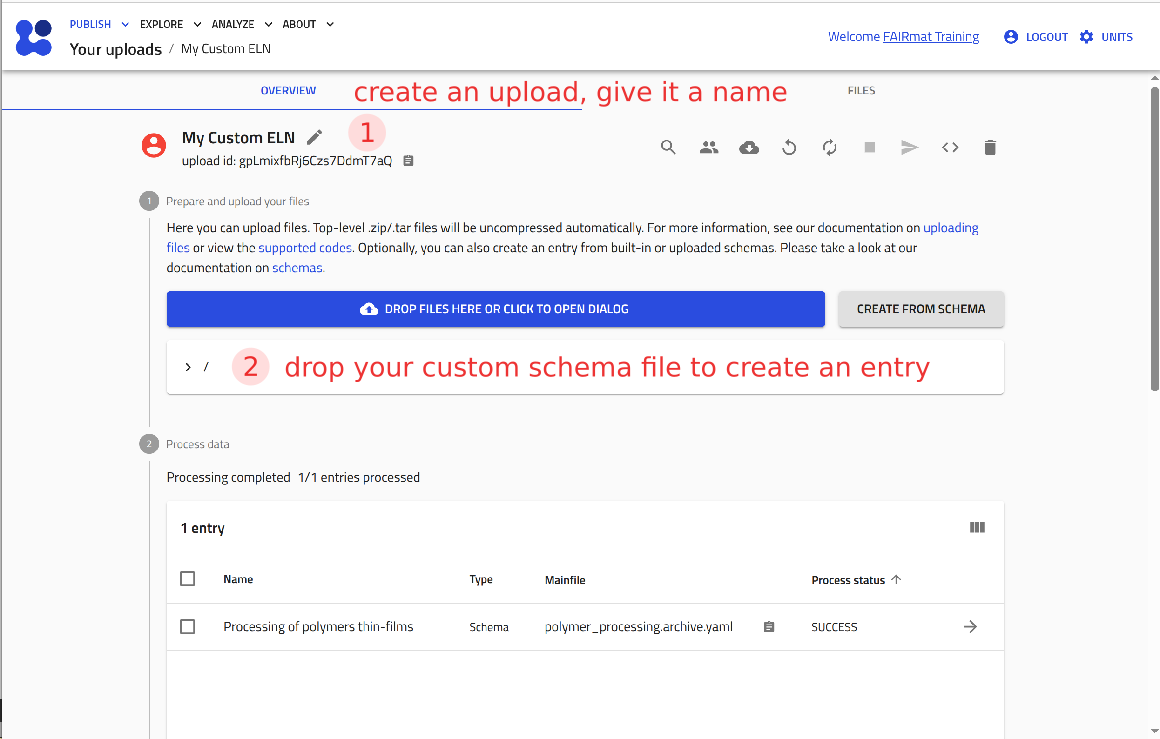
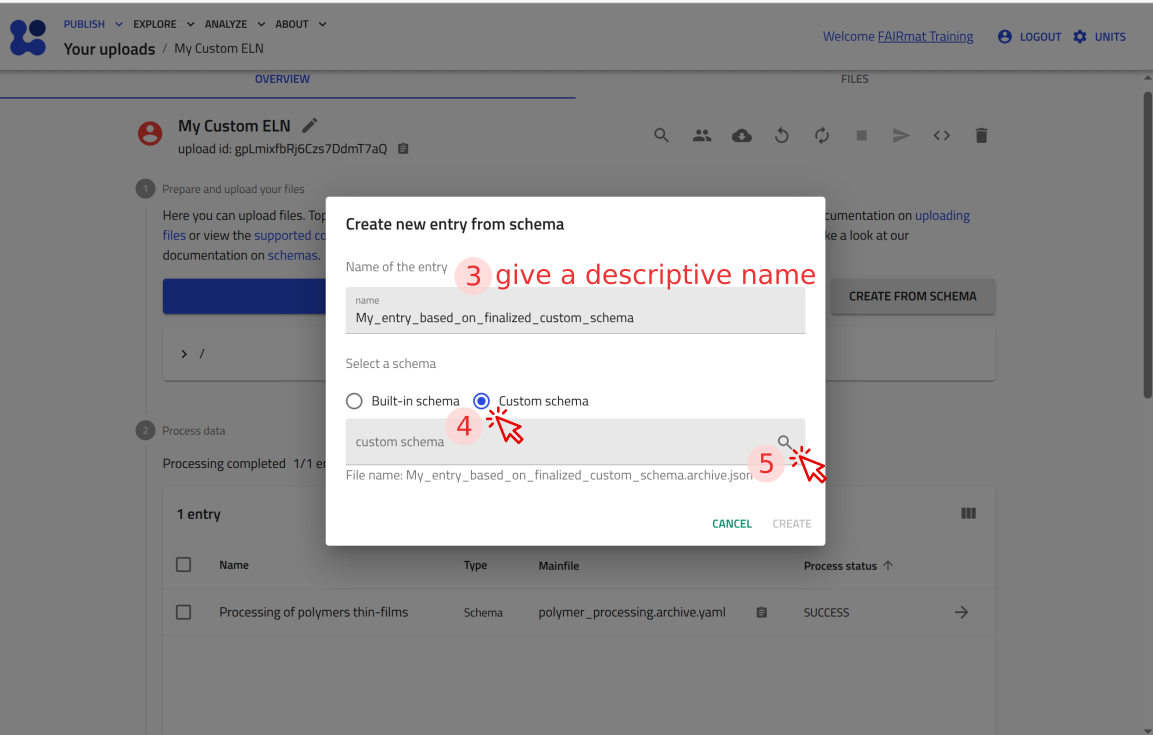
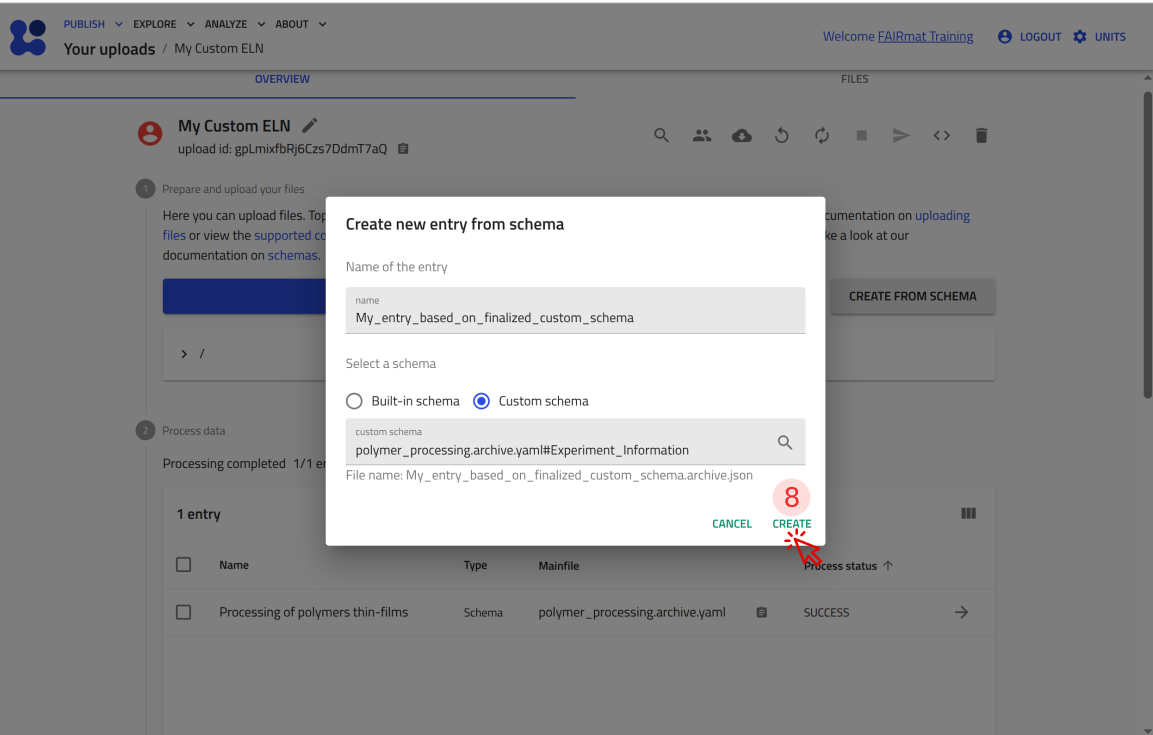
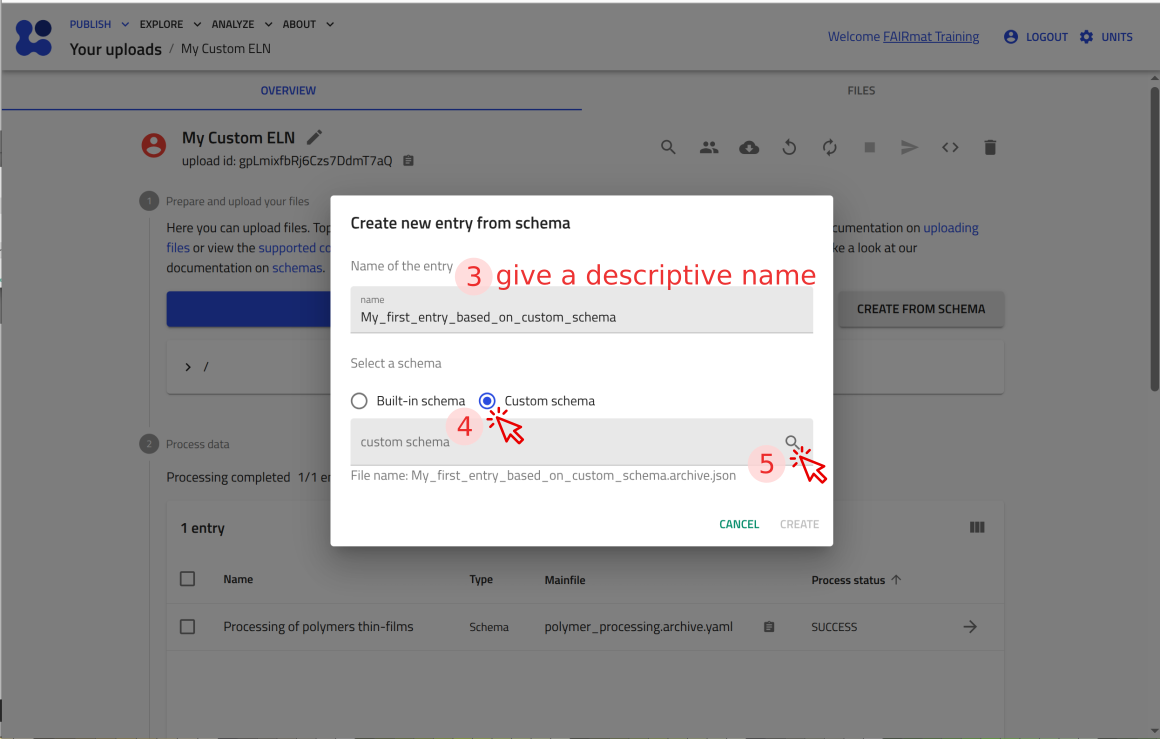
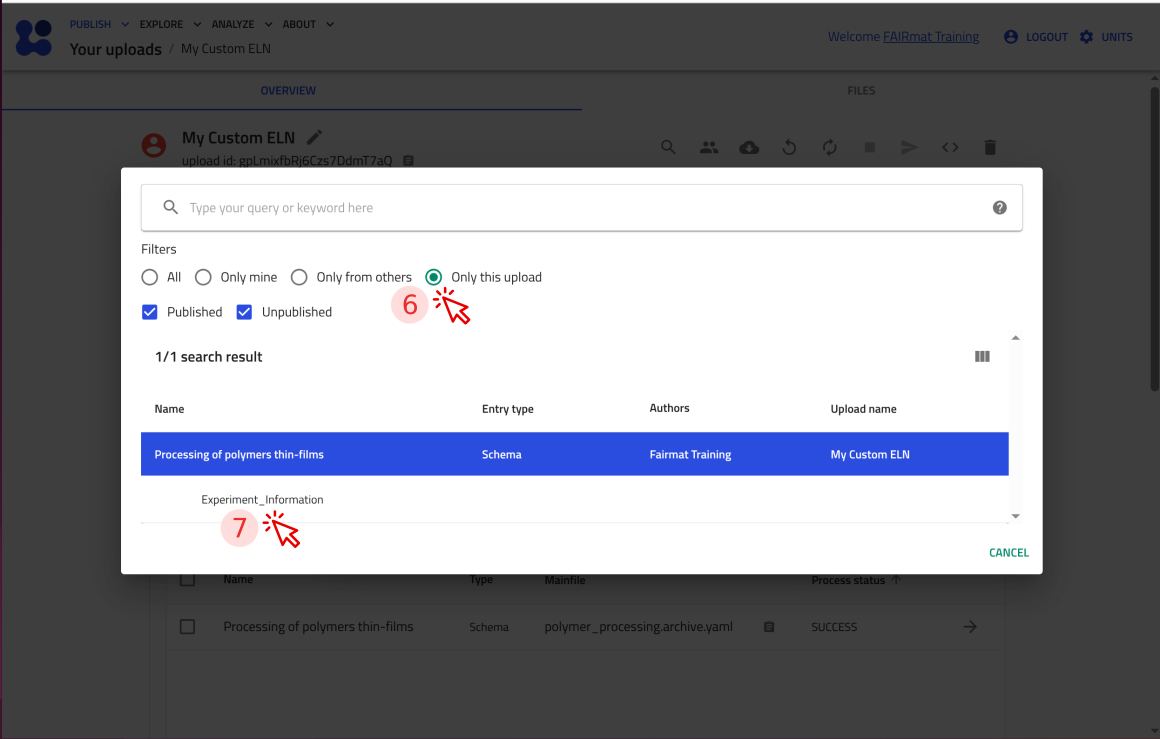
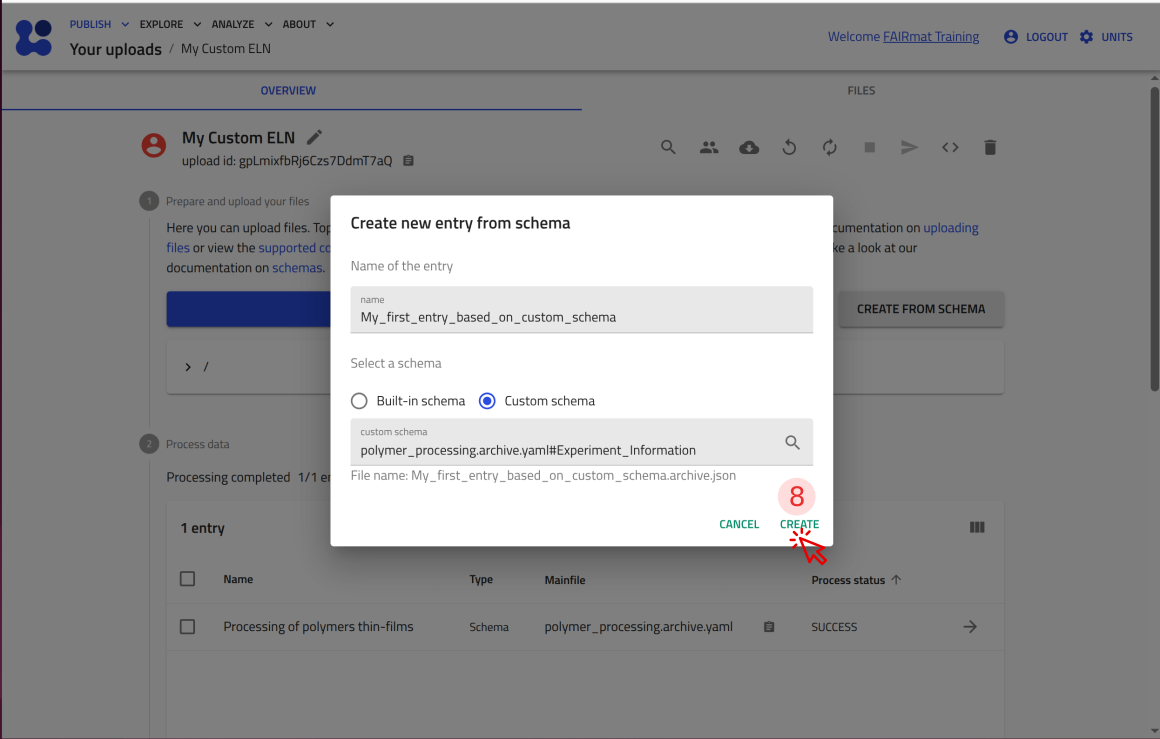
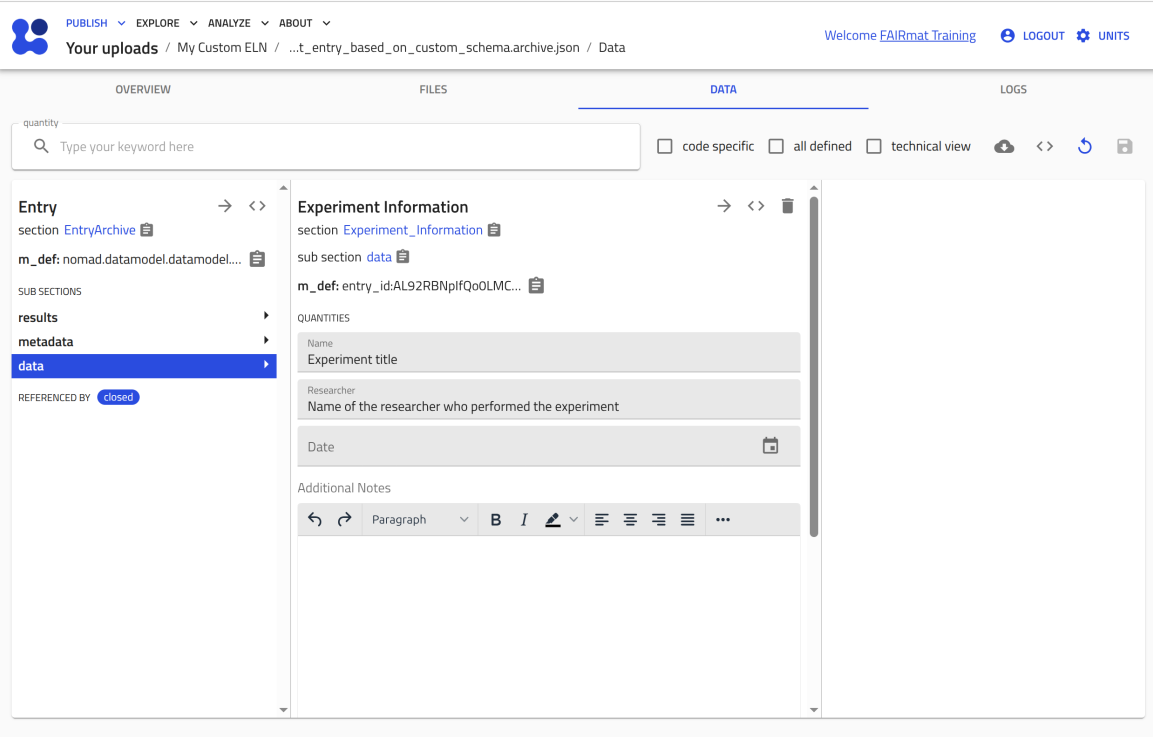
You can now upload this file to NOMAD and verify that it creates an ELN entry with the fields you defined.
Use the arrow buttons ⬅️➡️ below to follow the steps for uploading the schema and creating a test ELN entry.

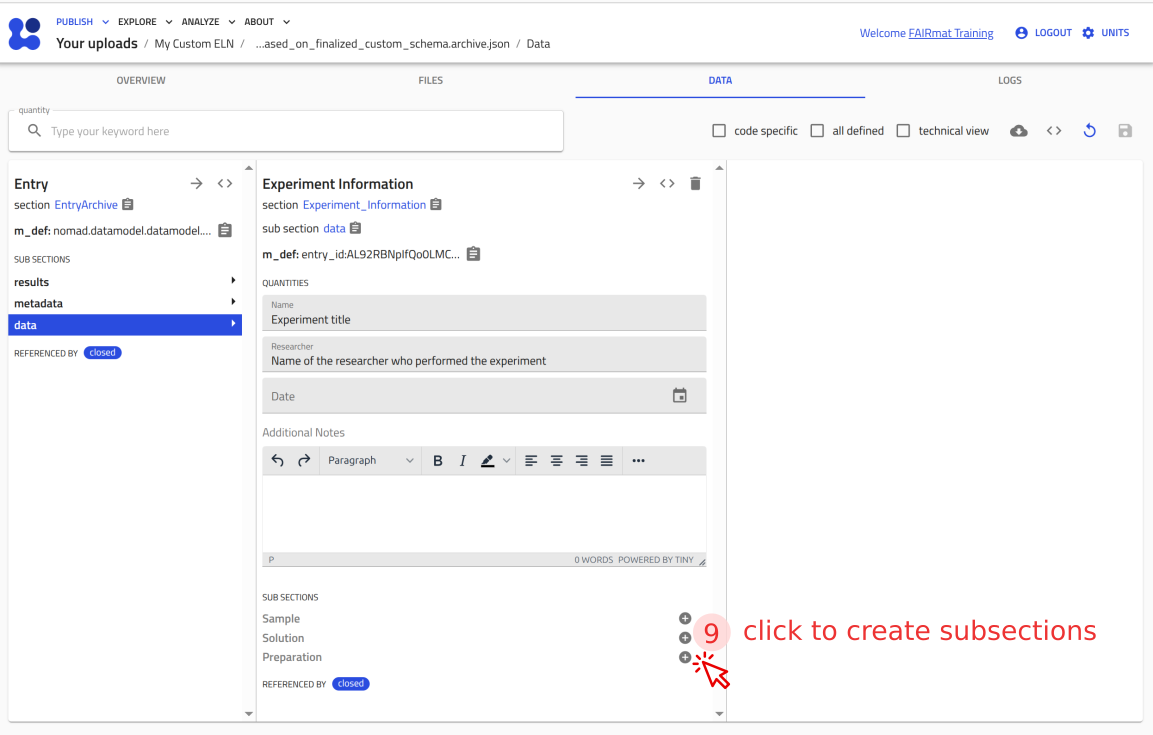
Step 6: Add subsections for sample, solution, and processing
Subsections define nested sections within a section. They allow you to group related information,such as sample details, solution composition, and preparation steps, into separate blocks within the ELN template.
In this step, you will extend your ELN schema by adding subsections under Experiment_Information: using the sub_sections: key.
Declare the subsections Sample, Solution, and Preparation, by adding the following content to the schema file:
-
sub_sections:introduces nested sections insideExperiment_Information. -
Each subsection is defined by a name (for example,
SampleorSolution) -
section:indicates that a section definition follows.
Where to paste: under Experiment_Information and indented one level (two spaces) with respect to it, i.e., sub_sections aligns with base_sections: and quantities:.
Checkpoint 4
This is the complete polymer_processing.archive.yaml file up to this point. Use it as a checkpoint to compare against your file.
definitions:
  name: Processing of polymers thin-films
  sections:
    Experiment_Information:
      base_sections:
        - nomad.datamodel.data.EntryData
      quantities:
        Name:
          type: str
          default: Experiment title
          m_annotations:
            eln:
              component: StringEditQuantity
        Researcher:
          type: str
          default: Name of the researcher who performed the experiment
          m_annotations:
            eln:
              component: StringEditQuantity
        Date:
          type: Datetime
          m_annotations:
            eln:
              component: DateTimeEditQuantity
        Additional_Notes:
          type: str
          m_annotations:
            eln:
              component: RichTextEditQuantity
      sub_sections:
        Sample:
          section:

        Solution:
          section:

        Preparation:
          section:
Next, you will define each subsection (Sample, Solution, and Preparation) using the same building blocks introduced in steps 3 to 5, such as base_sections:, quantities:, and m_annotations:.
These elements go under section: and are indented one level (two spaces) with respect to it.
The sample subsection
NOMAD already provides a generic base section for samples, i.e. nomad.datamodel.metainfo.eln.ELNSample.
By inheriting from it, you reuse NOMAD’s built-in sample structure instead of defining all the quantities yourself.
You can then tailor what is shown in the ELN by annotating the subsection and hiding inherited fields you don’t need.
Add the following content to the schema file:
            base_sections:
              - nomad.datamodel.metainfo.eln.ELNSample
            m_annotations:
              eln:
                overview: true
                hide: ['chemical_formula']
Where to paste: under the Sample:subsection and indented two levels (four spaces) with respect to it, i.e., one level with respect to the section: key.
-
overview: trueshows the subsection in the entry’s OVERVIEW tab in the GUI. -
hide: ['chemical_formula']hides thechemical_formulafield (inherited fromnomad.datamodel.metainfo.eln.ELNSample) from your custom ELN.
The solution subsection:
Define the Solution subsection by inheriting from the base section nomad.datamodel.metainfo.eln.ELNSample, hiding the inherited fields chemical_formula and description, and adding a new quantity Concentration to capture a numeric value with a unit.
To achieve this, add the following content to your schema file:
            base_sections:
              - nomad.datamodel.metainfo.eln.ELNSample
            m_annotations:
              eln:
                overview: true
                hide: ['chemical_formula', 'description']
            quantities:
              Concentration:
                type: np.float64
                unit: mg/ml
                m_annotations:
                  eln:
                    component: NumberEditQuantity
Where to paste: under the Solution:subsection and indented two levels (four spaces) with respect to it, i.e., one level with respect to the section: key.
-
overview: trueshows the Solution subsection in the entry’s OVERVIEW tab in the GUI. -
hide: ['chemical_formula', 'description']hides inherited fields from ELNSample that are not needed in this template. -
The
Concentrationquantity adds a numeric field with theunitmg/ml, rendered in the GUI usingNumberEditQuantity.
The preparation subsection
NOMAD already provides a generic base section for processes, i.e. nomad.datamodel.metainfo.eln.Process. By inheriting from it, you can document preparation steps using NOMAD’s built-in process structure instead of defining all the quantities yourself.
Add the following content to the schema file:
Where to paste: under the Preparation:subsection and indented two levels (four spaces) with respect to it, i.e., one level with respect to the section: key.
Checkpoint 5
This is the complete polymer_processing.archive.yaml file up to this point. Use it as a checkpoint to compare against your file.
definitions:
name: Processing of polymers thin-films
sections:
Experiment_Information:
base_sections:
- nomad.datamodel.data.EntryData
quantities:
Name:
type: str
default: Experiment title
m_annotations:
eln:
component: StringEditQuantity
Researcher:
type: str
default: Name of the researcher who performed the experiment
m_annotations:
eln:
component: StringEditQuantity
Date:
type: Datetime
m_annotations:
eln:
component: DateTimeEditQuantity
Additional_Notes:
type: str
m_annotations:
eln:
component: RichTextEditQuantity
sub_sections:
Sample:
section:
base_sections:
- nomad.datamodel.metainfo.eln.ELNSample
m_annotations:
eln:
overview: true
hide: ['chemical_formula']
Solution:
section:
base_sections:
- nomad.datamodel.metainfo.eln.ELNSample
m_annotations:
eln:
overview: true
hide: ['chemical_formula', 'description']
quantities:
Concentration:
type: np.float64
unit: mg/ml
m_annotations:
eln:
component: NumberEditQuantity
Preparation:
section:
            base_sections:
              - nomad.datamodel.metainfo.eln.Process
            m_annotations:
              eln:
                overview: true
Nested subsections
It is also possible to define subsections within other subsections. In this case, you will extend the Solution subsection by adding two nested subsections, Solute and Solvent.
These nested subsections allow you to record the solution composition by linking to existing substance entries and capturing the corresponding mass and volume.
Add the following sub_sections: block inside the Solution subsection:
            sub_sections:
              Solute:
                section:
                  quantities:
                    Substance:
                      type: nomad.datamodel.metainfo.eln.ELNSubstance
                      m_annotations:
                        eln:
                          component: ReferenceEditQuantity
                    Mass:
                      type: np.float64
                      unit: kilogram
                      m_annotations:
                        eln:
                          component: NumberEditQuantity
                          defaultDisplayUnit: milligram
              Solvent:
                section:
                  quantities:
                    Substance:
                      type: nomad.datamodel.metainfo.eln.ELNSubstance
                      m_annotations:
                        eln:
                          component: ReferenceEditQuantity
                    Volume:
                      type: np.float64
                      unit: meter ** 3
                      m_annotations:
                        eln:
                          component: NumberEditQuantity
                          defaultDisplayUnit: milliliter
Where to paste: under the Solution:subsection and indented two levels (four spaces) with respect to it, i.e., one level with respect to the section: key and aligned with base_sections:, m_annotations:, and quantities: of that section.
-
The
Substancequantity usesReferenceEditQuantityto link to an existingELNSubstanceentry. -
MassandVolumeare numeric quantities with physical units. -
defaultDisplayUnitcontrols which unit is shown by default in the GUI.
Indentation check
Indentation matters in YAML because it defines the structure of your schema.
- Keys at the same level should have the same indentation (for example,
Sample,Solution, andPreparationundersub_sections:). - Keys that define a section (
base_sections,quantities,sub_sections,m_annotations) must be indented one level (two spaces) deeper than the section name. - Keys that define a quantity (
type,unit,default,m_annotations) must be indented one level (two spaces) deeper than the quantity name.
Checkpoint 6 (final file)
This is the complete polymer_processing.archive.yaml file up to this point. Use it as a checkpoint to compare against your file.
definitions:
  name: Processing of polymers thin-films
  sections:
    Experiment_Information:
      base_sections:
        - nomad.datamodel.data.EntryData
      quantities:
        Name:
          type: str
          default: Experiment title
          m_annotations:
            eln:
              component: StringEditQuantity
        Researcher:
          type: str
          default: Name of the researcher who performed the experiment
          m_annotations:
            eln:
              component: StringEditQuantity
        Date:
          type: Datetime
          m_annotations:
            eln:
              component: DateTimeEditQuantity
        Additional_Notes:
          type: str
          m_annotations:
            eln:
              component: RichTextEditQuantity
      sub_sections:
        Sample:
          section:
            base_sections:
              - nomad.datamodel.metainfo.eln.ELNSample
            m_annotations:
              eln:
                overview: true
                hide: ['chemical_formula']
        Solution:
          section:
            base_sections:
              - nomad.datamodel.metainfo.eln.ELNSample
            m_annotations:
              eln:
                overview: true
                hide: ['chemical_formula', 'description']
            quantities:
              Concentration:
                type: np.float64
                unit: mg/ml
                m_annotations:
                  eln:
                    component: NumberEditQuantity
            sub_sections:
              Solute:
                section:
                  quantities:
                    Substance:
                      type: nomad.datamodel.metainfo.eln.ELNSubstance
                      m_annotations:
                        eln:
                          component: ReferenceEditQuantity
                    Mass:
                      type: np.float64
                      unit: kilogram
                      m_annotations:
                        eln:
                          component: NumberEditQuantity
                          defaultDisplayUnit: milligram
              Solvent:
                section:
                  quantities:
                    Substance:
                      type: nomad.datamodel.metainfo.eln.ELNSubstance
                      m_annotations:
                        eln:
                          component: ReferenceEditQuantity
                    Volume:
                      type: np.float64
                      unit: meter ** 3
                      m_annotations:
                        eln:
                          component: NumberEditQuantity
                          defaultDisplayUnit: milliliter
        Preparation:
          section:
            base_sections:
              - nomad.datamodel.metainfo.eln.Process
            m_annotations:
              eln:
                overview: true
How to read it: this .archive.yaml file defines a schema package under definitions. The package has a name and defines one main section called Experiment_Information under sections: keyword. The main section Experiment_Information inherits from some base sections using base_sections:keyword (here nomad.datamodel.data.EntryData), defines some quantities under quantities: keyword, and groups additional information by introducing three subsections Sample, Solution, Preparation, using sub_sections: keyword. Each of these three subsections has its own section definition (with keys like base_sections:, quantities:, sub_sections:, and m_annotations: like before). The Solution subsection itself also contains two nested subsections, the Solute and the Solvent, each having their own definition.
Step 7: Test your custom schema in NOMAD
You can now upload this file to NOMAD and verify that it creates an ELN entry with the fields you defined.
Use the arrow buttons ⬅️➡️ below to follow the steps for uploading the schema and creating a test ELN entry.