Create a Schema Package
This tutorial guides you through creating a NOMAD plugin with a custom schema package. While schemas can be added to NOMAD using YAML, this tutorial focuses on Python-based schema packages. These packages can be version-controlled using Git, integrate seamlessly at the system level with your NOMAD instance, and allow you to implement custom normalization logic.
Learning Outcomes
By the end of this tutorial, you will be able to:
- Create a NOMAD plugin containing a custom schema package.
- Use NOMAD's Python API to define and register data schemas.
- Add user-interaction capabilities to a schema using ELN annotations.
- Implement data processing functionality using NOMAD's normalization framework.
Before you begin
This tutorial assumes basic familiarity with Python and Git. You should have Python 3.10 or higher installed, along with Git. We recommend using a modern Python IDE (such as VS Code or PyCharm) to follow along.
We will use the nomad-plugin-tutorials repository to build the schema package step by step. Start by cloning the repository and navigating into it:
To access the "tutorial mode" version of the code (which contains code-along exercises with missing snippets for you to implement), switch to the tutorial-mode branch:
For instructions on installing and running the plugin locally, refer to the repository's README.md.
The schema package tutorial code is located in the src / nomad_plugin_tutorials / schema directory.
Your first NOMAD schema package
In NOMAD, a schema defines the structure of data in a Python class using quantities and nested sub-sections. We will learn how to build a schema by implementing a calculation for Planck spectral radiance (or black-body radiation).
Here is an overview of the schema structure we will build:
BlackbodyResults:
    temperature: float
    wavelength: array[float]
    spectral_radiance: array[float]
    peak_wavelength: float

BlackbodyRadiation:    # ELN schema (allows user interaction in GUI)
    name: str
    temperature: float
    wavelength_min: float
    wavelength_max: float
    results: BlackbodyResults
Define a section using ArchiveSection
To define a custom schema section in NOMAD, we inherit from the ArchiveSection base class and declare data fields using Quantity.
Let's start by defining the results section:
from nomad.datamodel.data import ArchiveSection

class BlackbodyResults(ArchiveSection):
    """
    Results of the Planck spectral radiance calculation.
    """
Each Quantity represents a data field and requires a type (e.g., float, str). We can also customize it by adding:
shape: Specifies the dimensions. For example,shape=['*']represents a 1D array, while omitting it defaults to a scalar.unit: Standardizes the unit of the quantity (e.g.,'K','nm').description: Documents the field for the user interface.
For example, we can define scalar temperature and 1D-array wavelength quantities as follows:
from nomad.datamodel.data import ArchiveSection
from nomad.metainfo import Quantity

class BlackbodyResults(ArchiveSection):
    """
    Results of the Planck spectral radiance calculation.
    """
    temperature = Quantity(
        type=float,
        unit='K',
        description='Temperature of the blackbody in Kelvin.',
    )
    wavelength = Quantity(
        type=float,
        shape=['*'],
        unit='nm',
        description='Wavelength array in nm.',
    )
Tutorial 1.1
In the BlackbodyResults section, add the quantities for spectral radiance and peak wavelength with suitable type, shape, unit, and description.
You can find this class in the tutorial-mode branch under src / nomad_plugin_tutorials / schema / schema_package.py. Read the instructions in the code for more information.
Tutorial 1.1: Solution
class BlackbodyResults(ArchiveSection):
    """
    Results of the Planck spectral radiance calculation.
    """
    temperature = Quantity(
        type=float,
        unit='K',
        description='Temperature of the blackbody in Kelvin.',
    )
    wavelength = Quantity(
        type=float,
        shape=['*'],
        unit='nm',
        description='Wavelength array in nm.',
    )
    spectral_radiance = Quantity(
        type=float,
        shape=['*'],
        unit='W sr⁻¹ m⁻³',
        description='Spectral radiance B(λ,T) in W·sr⁻¹·m⁻³ at each wavelength.',
    )
    peak_wavelength = Quantity(
        type=float,
        unit='nm',
        description=(
            "Wavelength of maximum emission in nm, from Wien's displacement law: "
            'λ_max = b / T,  b = 2.898 × 10⁻³ m·K.'
        ),
    )
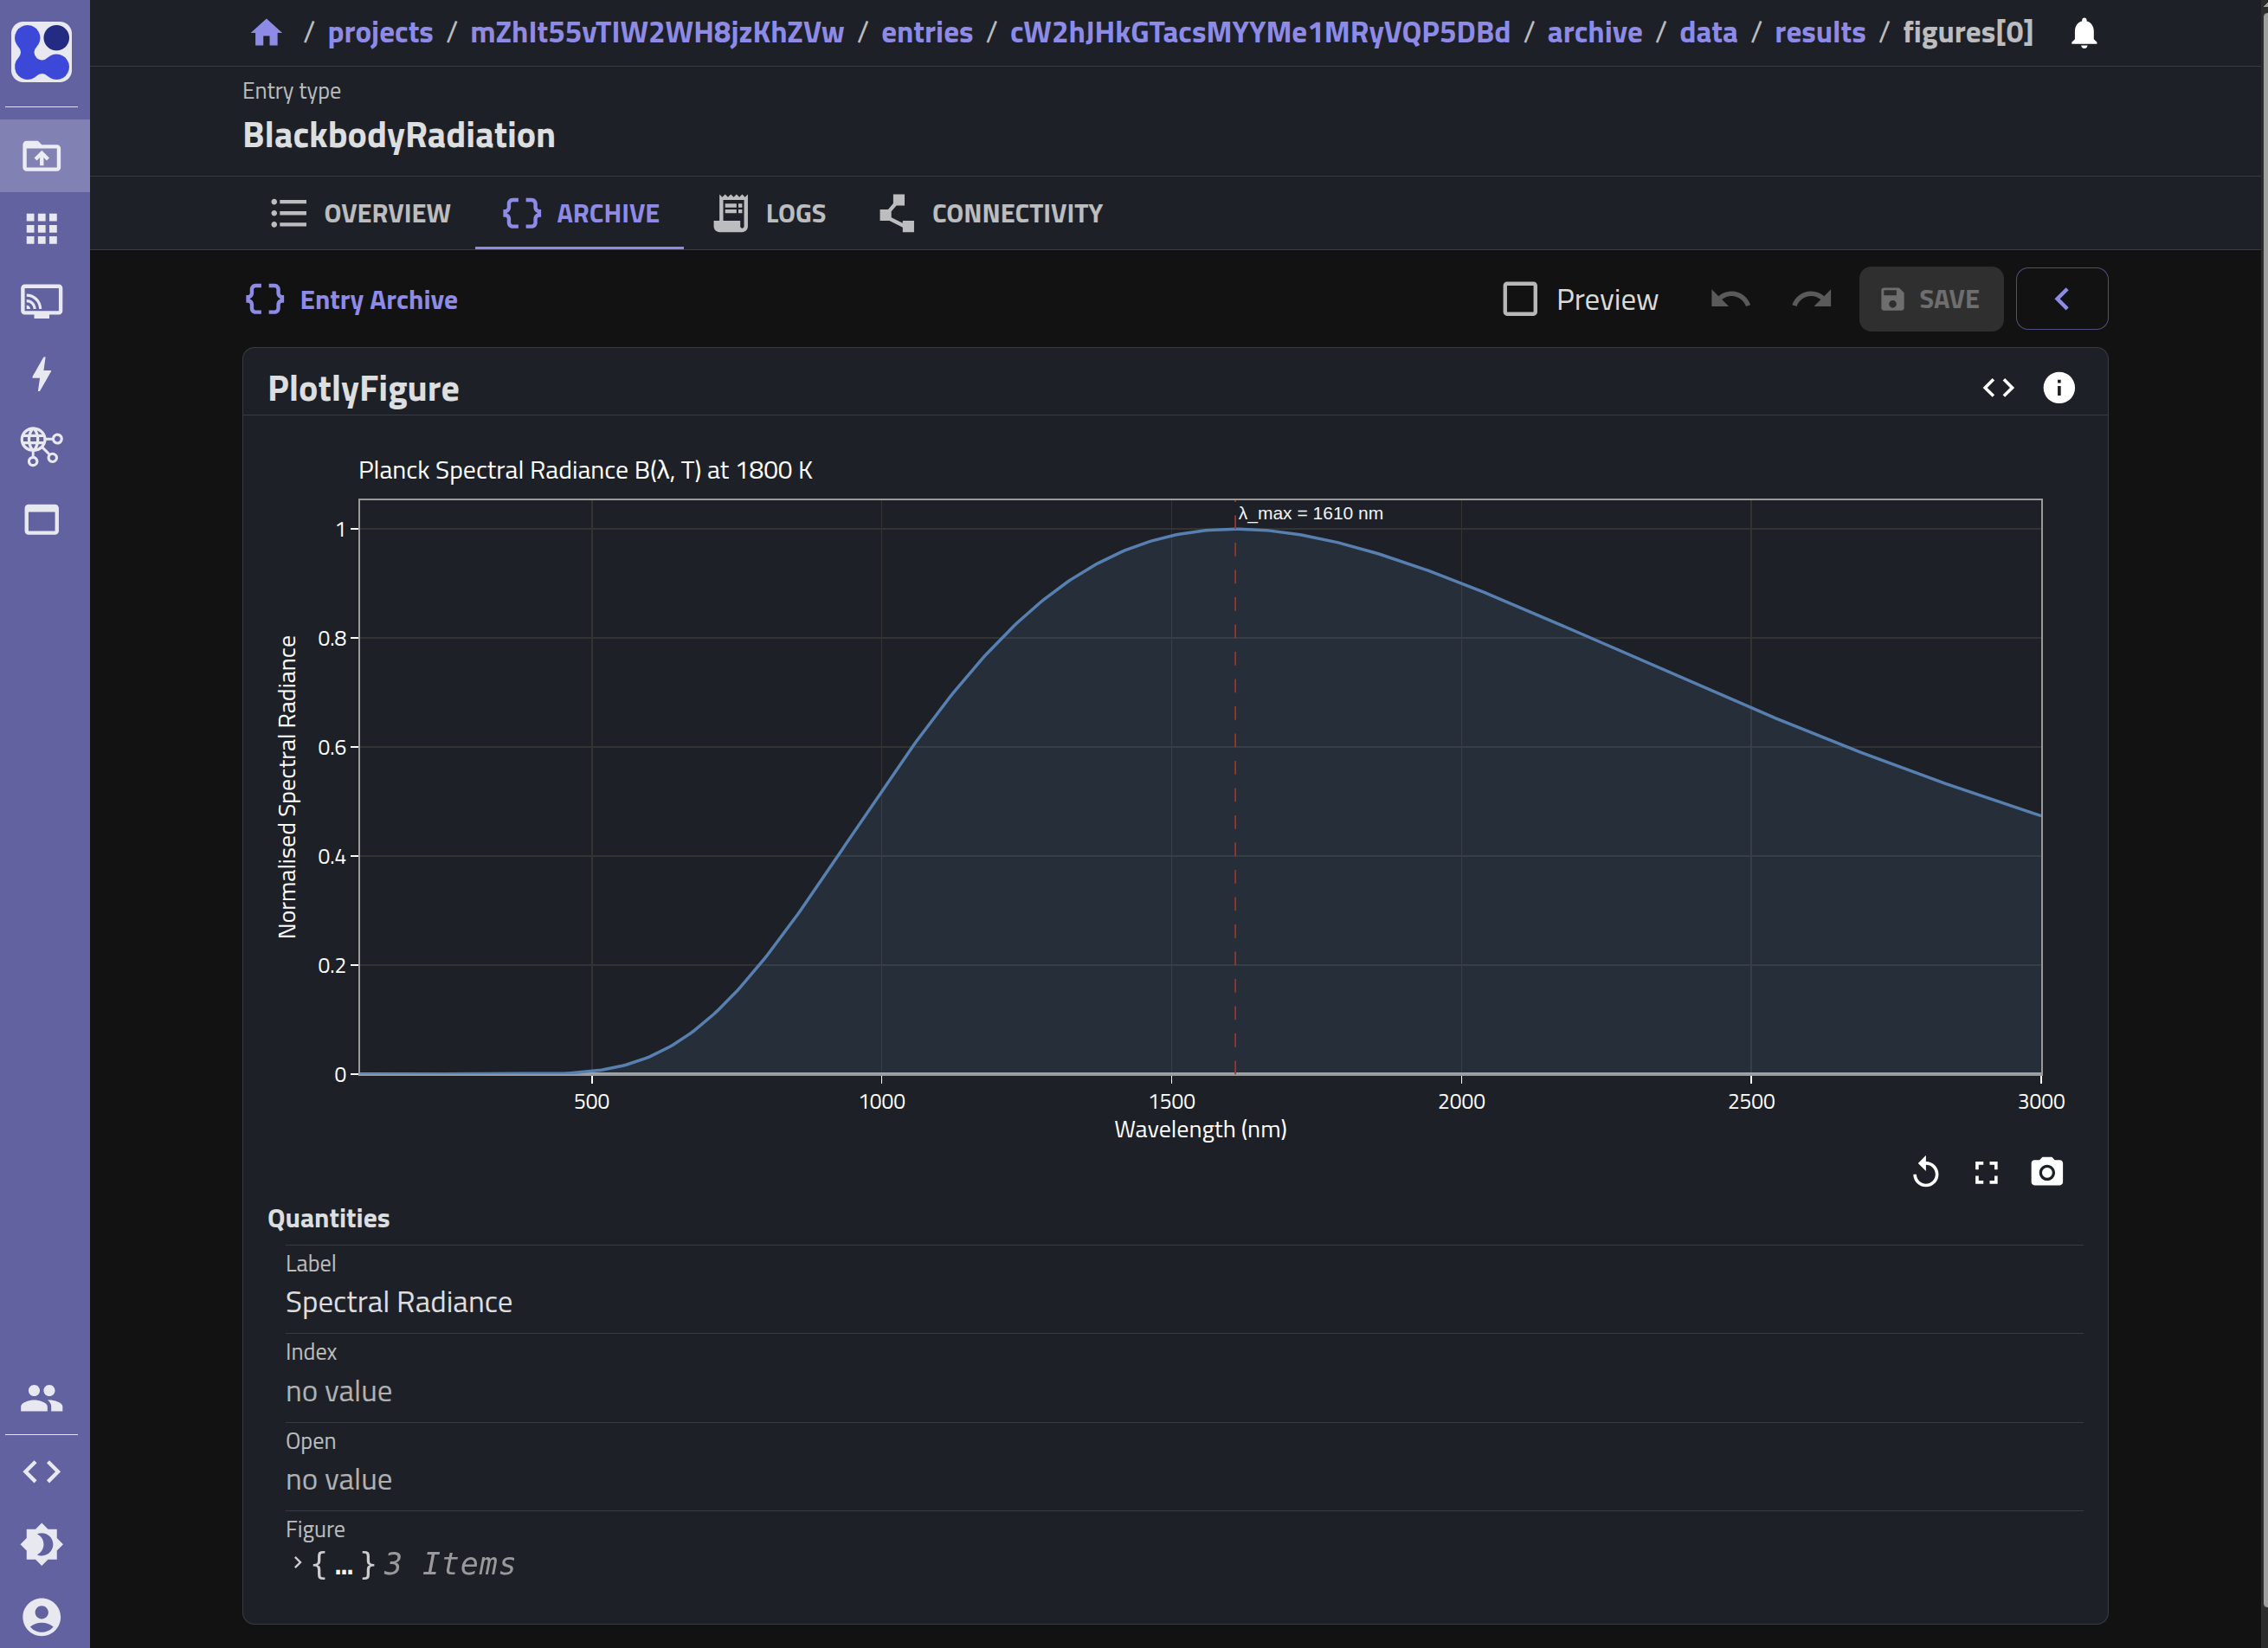
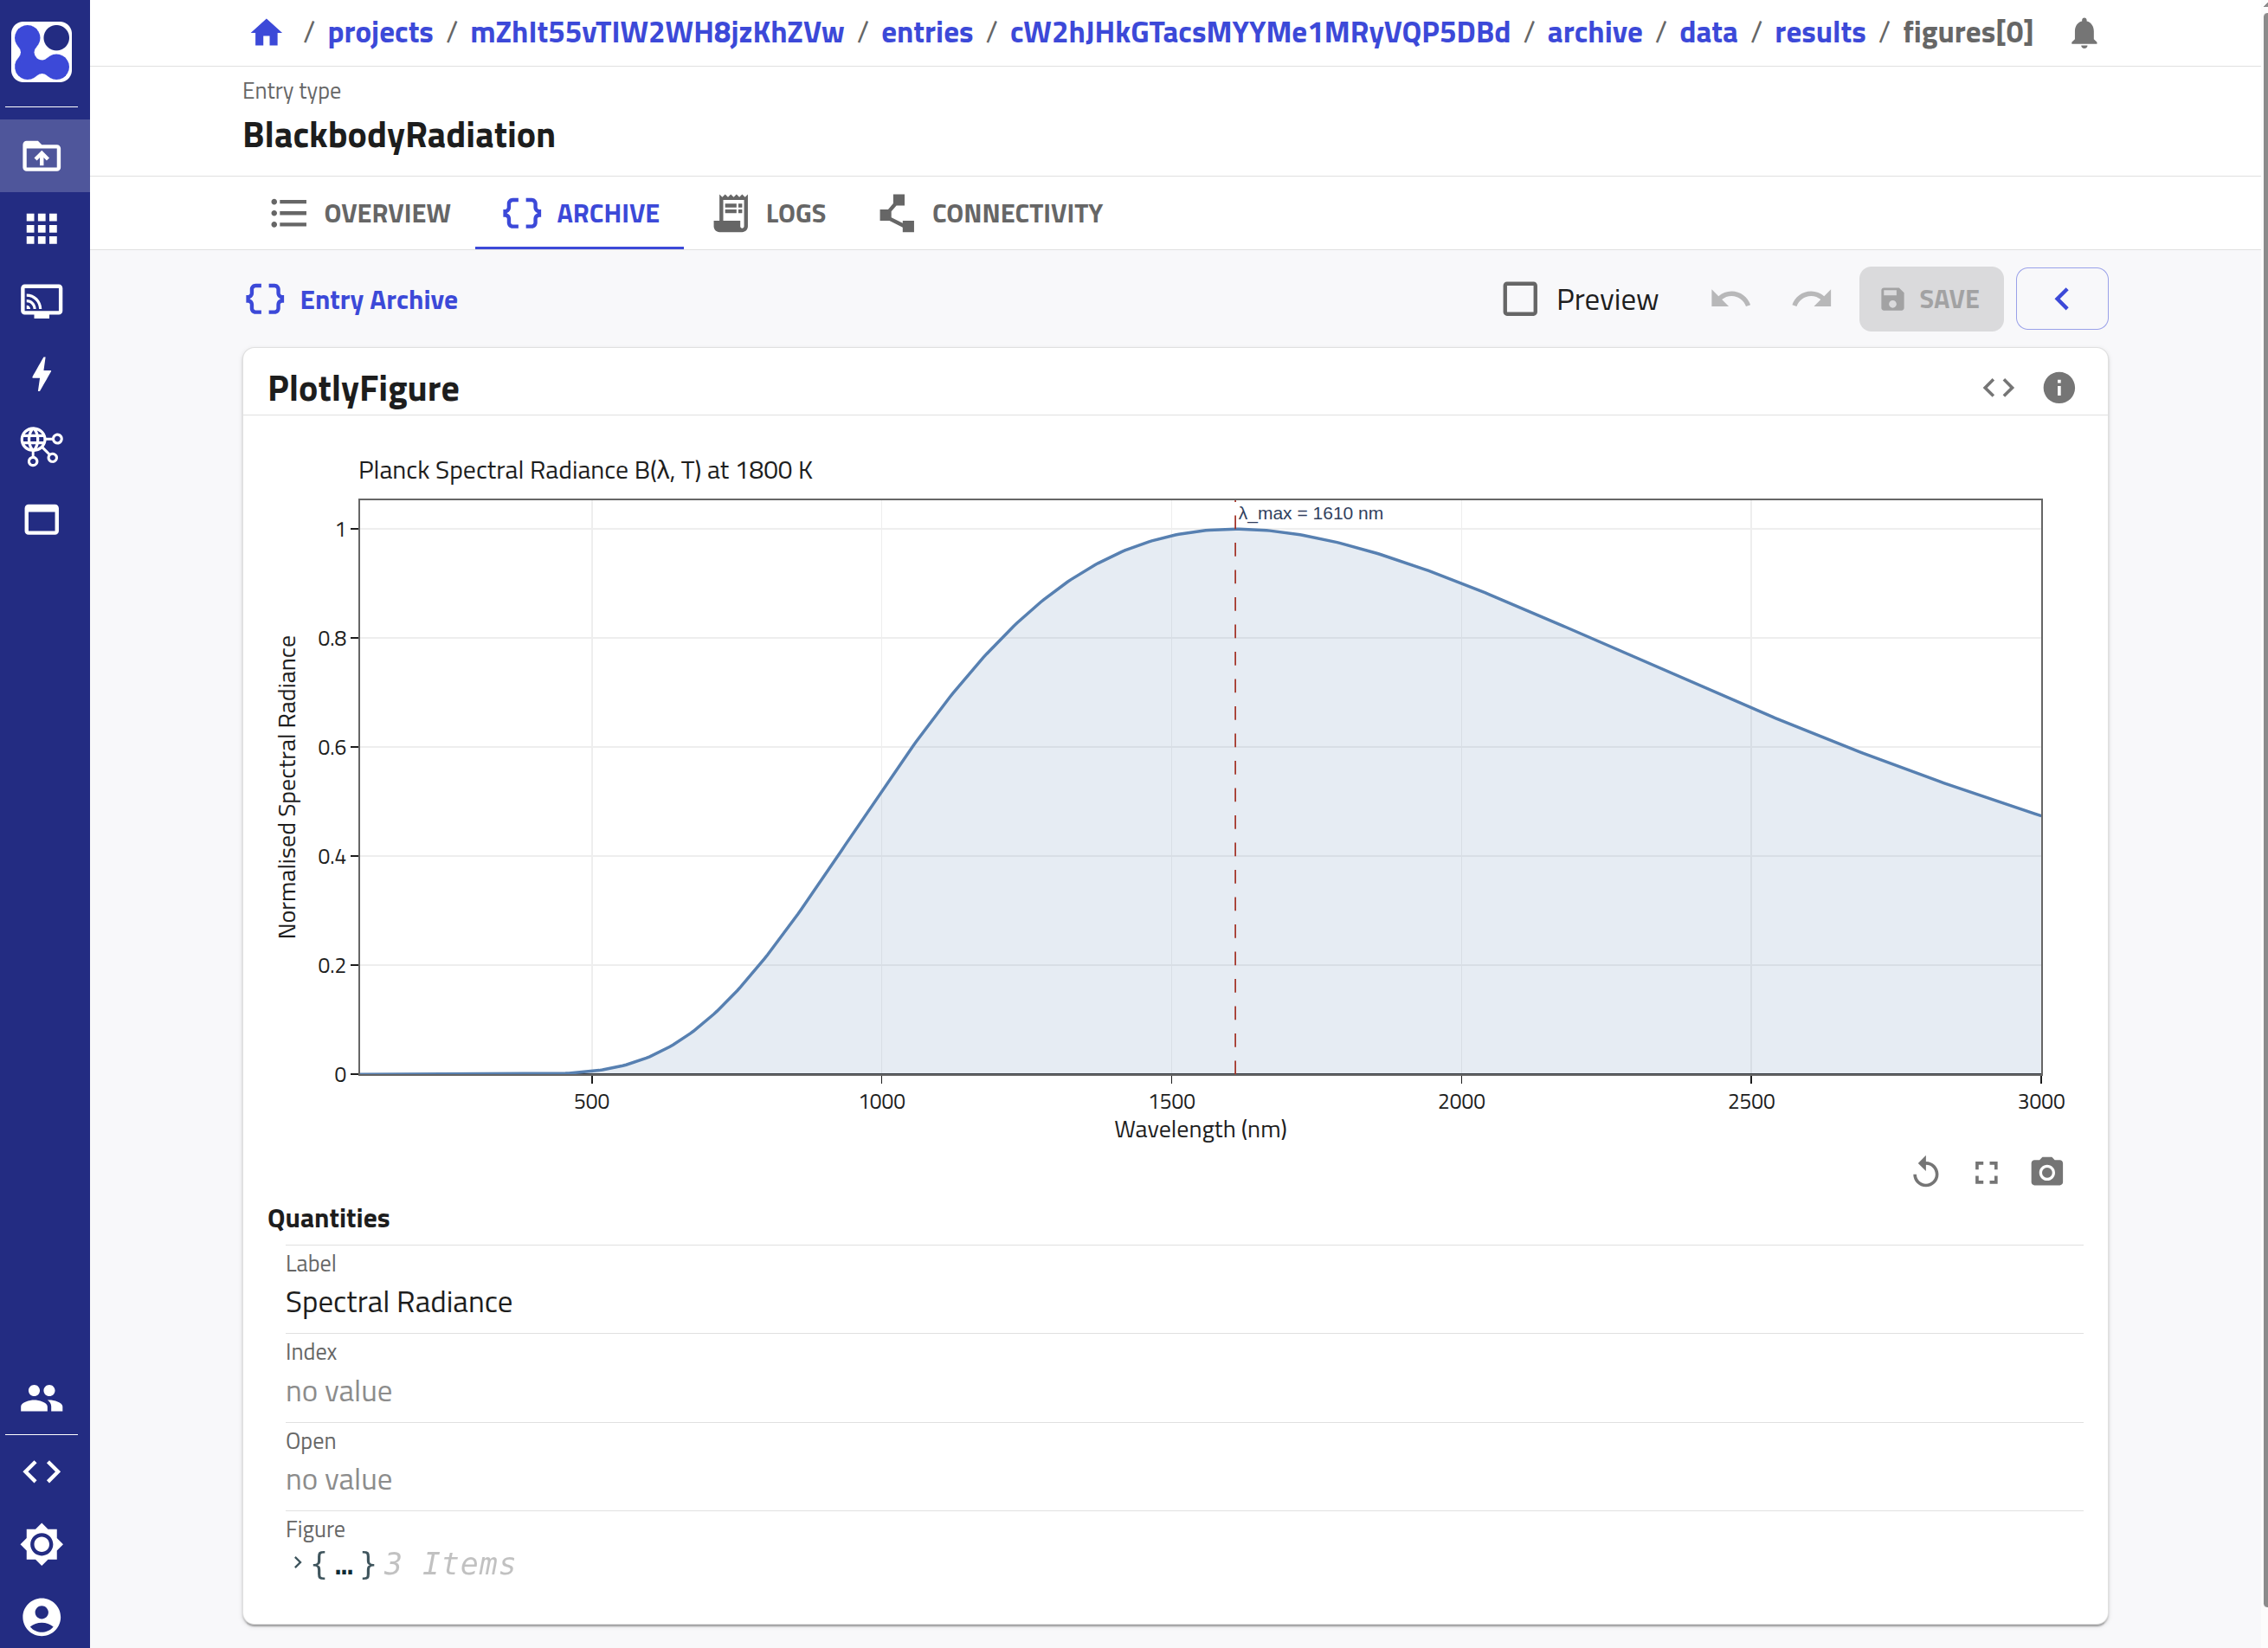
Add plot capabilities with PlotSection
To visualize calculated data directly in the NOMAD GUI, you can define custom plots. This capability is added by:
- Inheriting from the
PlotSectionbase class, which automatically adds a repeatablefiguressub-section to your section. - Implementing the
normalizemethod of the section to generate the Plotly figure and populate thefiguressub-section.
NOMAD uses Plotly to render the interactive plots from JSON-serialized data. Each entry in the figures list is a PlotlyFigure object, which requires a JSON-serialized Plotly figure (produced using the Plotly figure's .to_plotly_json() method).
Let's define a new class BlackbodyResultsPlot that inherits from both BlackbodyResults (to include all of our data quantities) and PlotSection (to inherit the figures sub-section):
from nomad.datamodel.metainfo.plot import PlotSection

class BlackbodyResultsPlot(BlackbodyResults, PlotSection):
    """
    Section that generates a Plotly plot of the spectral radiance profile and
    populates `figures` subsection with JSON-serialized Plotly figure data.
    """

    def normalize(self, archive: 'EntryArchive', logger: 'BoundLogger') -> None:
        """
        Creates a Plotly line plot of B(λ, T) and marks the peak wavelength.
        Stores the figure in `self.figures` for display in the NOMAD UI.
        """
        super().normalize(archive, logger)
Within the normalize method of BlackbodyResultsPlot, we want to:
- Call
super().normalize(archive, logger)to execute any normalizer logic from parent classes. - Verify that our input quantities (
wavelengthandspectral_radiance) are present before attempting to plot. - Import the helper plotting function
plot_blackbody_spectrumfrom the visualization module:nomad_plugin_tutorials.schema.visualize. - Set
self.figuresto a list containing aPlotlyFigurepopulated with the JSON-serialized Plotly figure.
Tutorial 1.2
Implement the normalize method in BlackbodyResultsPlot to generate the Plotly plot.
You can find this class in the tutorial-mode branch under src / nomad_plugin_tutorials / schema / schema_package.py. Read the instructions in the code for more information.
Tutorial 1.2: Solution
def normalize(self, archive: 'EntryArchive', logger: 'BoundLogger') -> None:
    """
    Creates a Plotly line plot of B(λ, T) and marks the peak wavelength.
    Stores the figure in `self.figures` for display in the NOMAD UI.
    """
    super().normalize(archive, logger)

    if self.wavelength is None or self.spectral_radiance is None:
        return

    from nomad.datamodel.metainfo.plot import PlotlyFigure

    from nomad_plugin_tutorials.schema.visualize import plot_blackbody_spectrum

    plotly_figure = plot_blackbody_spectrum(
        temperature=self.temperature.to('K').magnitude,
        wavelength=self.wavelength.to('nm').magnitude,
        spectral_radiance=self.spectral_radiance.to('W sr⁻¹ m⁻³').magnitude,
        peak_wavelength=self.peak_wavelength.to('nm').magnitude,
    )

    self.figures = [
        PlotlyFigure(
            label='Spectral Radiance',
            figure=plotly_figure.to_plotly_json(),
        )
    ]
Define the root section of an entry
When defining the root section of an entry, we can use the EntryData base
class. It identifies the root section and sets the metadata appropriately. In
addition, NOMAD also provides a set of
basesections
broadly inspired from Basic-Formal Ontology's (BFO) Entity-Activity model.
Inheriting basesections for your schema gives them a semantic meaning that is
quickly recognizable in NOMAD. Since our root section is meant to calculate and
save spectral radiance data, let's use the Activity basesection.
We define the root class BlackbodyRadiation with quantities that have
ELN annotations
(a_eln). These annotations determine how each quantity is
rendered in the GUI (e.g. text inputs or number edits) and allow input
from users.
from nomad.datamodel.data import EntryData
from nomad.datamodel.metainfo.annotations import ELNAnnotation, ELNComponentEnum
from nomad.datamodel.metainfo.basesections import Activity
from nomad.metainfo import Section, SubSection

class BlackbodyRadiation(Activity, EntryData):
    """
    ELN schema for a Planck blackbody radiation calculation.
    """
    m_def = Section(label="Blackbody Radiation (Planck's Law)")

    name = Quantity(
        type=str,
        label='Source name',
        description='Name of the emitting body, e.g. "Molten Iron" or '
        "Solar surface".',
        a_eln=ELNAnnotation(component=ELNComponentEnum.StringEditQuantity),
    )
    temperature = Quantity(
        type=float,
        unit='K',
        description='Temperature of the blackbody in Kelvin.',
        a_eln=ELNAnnotation(component=ELNComponentEnum.NumberEditQuantity),
    )
To compose our schema hierarchically, we can include other sections inside the
root section as sub-sections using the SubSection class. For example, we
can embed the BlackbodyResultsPlot section under the results sub-section to
cleanly separate the input parameters from the calculation outputs:
Tutorial 1.3
Complete the class definition of BlackbodyRadiation by defining the quantities for wavelength_min and wavelength_max (using NumberEditQuantity components and default values of 100.0 and 3000.0 respectively) and composing BlackbodyResultsPlot inside the results sub-section.
You can find this class in the tutorial-mode branch under src / nomad_plugin_tutorials / schema / schema_package.py. Read the instructions in the code for more information.
Tutorial 1.3: Solution
class BlackbodyRadiation(Activity, EntryData):
    """
    ELN schema for a Planck blackbody radiation calculation.
    """
    m_def = Section(label="Blackbody Radiation (Planck's Law)")

    name = Quantity(
        type=str,
        label='Source name',
        description='Name of the emitting body, e.g. "Molten Iron" or "Solar surface".',
        a_eln=ELNAnnotation(component=ELNComponentEnum.StringEditQuantity),
    )
    temperature = Quantity(
        type=float,
        unit='K',
        description=(
            'Temperature of the blackbody in Kelvin. '
            'Examples: molten iron ≈ 1800 K, solar surface ≈ 5778 K, '
            'hot furnace ≈ 1200 K.'
        ),
        a_eln=ELNAnnotation(component=ELNComponentEnum.NumberEditQuantity),
    )
    wavelength_min = Quantity(
        type=float,
        unit='nm',
        description='Lower bound of the wavelength range in nm. Defaults to 100 nm.',
        default=100.0,
        a_eln=ELNAnnotation(component=ELNComponentEnum.NumberEditQuantity),
    )
    wavelength_max = Quantity(
        type=float,
        unit='nm',
        description='Upper bound of the wavelength range in nm. Defaults to 3000 nm.',
        default=3000.0,
        a_eln=ELNAnnotation(component=ELNComponentEnum.NumberEditQuantity),
    )
    results = SubSection(section_def=BlackbodyResultsPlot)
Add the calculation logic
The normalizer of the root class allows us to implement the core physics/calculation logic in Python. When the user saves an entry in the NOMAD GUI, the normalize() method is executed.
In this part, we will use a helper function planck_spectrum from the nomad_plugin_tutorials.schema.calculate module to calculate the Planck blackbody radiation profile. We then populate the results sub-section and trigger its plot normalizer.
Additionally, we map the custom name quantity to NOMAD's standardized search indexing metadata at archive.results.material.material_name, making our custom entry easily searchable.
Tutorial 1.4
Implement the normalize method in the BlackbodyRadiation class to run the Planck spectrum calculation, assign it to the results sub-section, and populate the search metadata.
You can find this class in the tutorial-mode branch under src / nomad_plugin_tutorials / schema / schema_package.py. Read the instructions in the code for more information.
Tutorial 1.4: Solution
def normalize(self, archive: 'EntryArchive', logger: 'BoundLogger') -> None:
    """
    Computes the Planck spectral radiance B(λ, T) based on user inputs, stores
    the arrays in results, and writes the source name to `archive.results`.
    """
    self.method = 'Planck Spectral Radiance'

    from nomad_plugin_tutorials.schema.calculate import (
        planck_spectrum,
    )

    if self.temperature:
        ps = planck_spectrum(
            temperature=self.temperature.to('K').magnitude,
            wavelength_min=self.wavelength_min.to('nm').magnitude,
            wavelength_max=self.wavelength_max.to('nm').magnitude,
        )

        results = BlackbodyResultsPlot(
            temperature=self.temperature,
            wavelength=ps['wavelength'],
            spectral_radiance=ps['spectral_radiance'],
            peak_wavelength=ps['peak_wavelength'],
        )
        results.normalize(archive, logger)
        self.results = results
    else:
        logger.warning(
            'Temperature not provided; skipping Planck spectrum calculation.'
        )
        self.results = None

    if self.name:
        archive.m_setdefault('results/material')
        archive.results.material.material_name = self.name

    super().normalize(archive, logger)
Wrapping the sections with SchemaPackage
SchemaPackage is the container that groups all schema sections into a single
registerable unit. It must be instantiated as m_package = SchemaPackage() at
the top of the module before any section classes are defined and finalized with
m_package.__init_metainfo__() at the very end, once all classes are in place.
from nomad.metainfo import SchemaPackage

m_package = SchemaPackage()  # instantiate SchemaPackage

class BlackbodyResults(...):
    ...

class BlackbodyResultsPlot(...):
    ...

class BlackbodyRadiation(...):
    ...

m_package.__init_metainfo__()  # initialize the metainfo from section classes
Register the schema package
Why registering the schema package is required
Registering the schema package as a plugin entry point makes it discoverable by NOMAD at runtime. Without this registration, NOMAD cannot load your schema, and your custom sections will not be available.
To register the schema package, we define a plugin entry point by updating the metadata in the __init__.py file under src / nomad_plugin_tutorials / schema.
We inherit from SchemaPackageEntryPoint and override its load() method to return the m_package of our schema:
from nomad.config.models.plugins import SchemaPackageEntryPoint

class BlackbodyRadiationSchemaEntryPoint(SchemaPackageEntryPoint):
    def load(self):
        from nomad_plugin_tutorials.schema.schema_package import (
            m_package,
        )

        return m_package

blackbody_radiation = BlackbodyRadiationSchemaEntryPoint(
    name='Blackbody Radiation Schema',
    description='Example blackbody radiation schema package entry point.',
)
Next, add the entry point to your pyproject.toml file under the [project.entry-points.'nomad.plugin'] section:
[project.entry-points.'nomad.plugin']
schema_tutorial = "nomad_plugin_tutorials.schema:blackbody_radiation"
Finally, reinstall the plugin in editable mode to make the new entry point available to NOMAD:
or use uv sync if you are using uv.
Testing
Using Python API
Run the cells in src / nomad_plugin_tutorials / schema / tutorial.ipynb.
The notebook walks through these steps:
- Create an empty
EntryArchive. - Instantiate
BlackbodyRadiationand attach it toarchive.data. - Run normalization with
normalize_all. - Inspect the normalized archive and derived results.
- Render the generated Plotly figure.
Using the GUI
Testing the GUI outcome requires a local NOMAD GUI development setup. For that, use Option 2: nomad-distro-dev from the previous tutorial and add your plugin to that environment. With this, you can spin up a local development deployment of NOMAD.
Let's start by creating a new Upload (or Project) there:
-
Create an entry and populate the temperature.
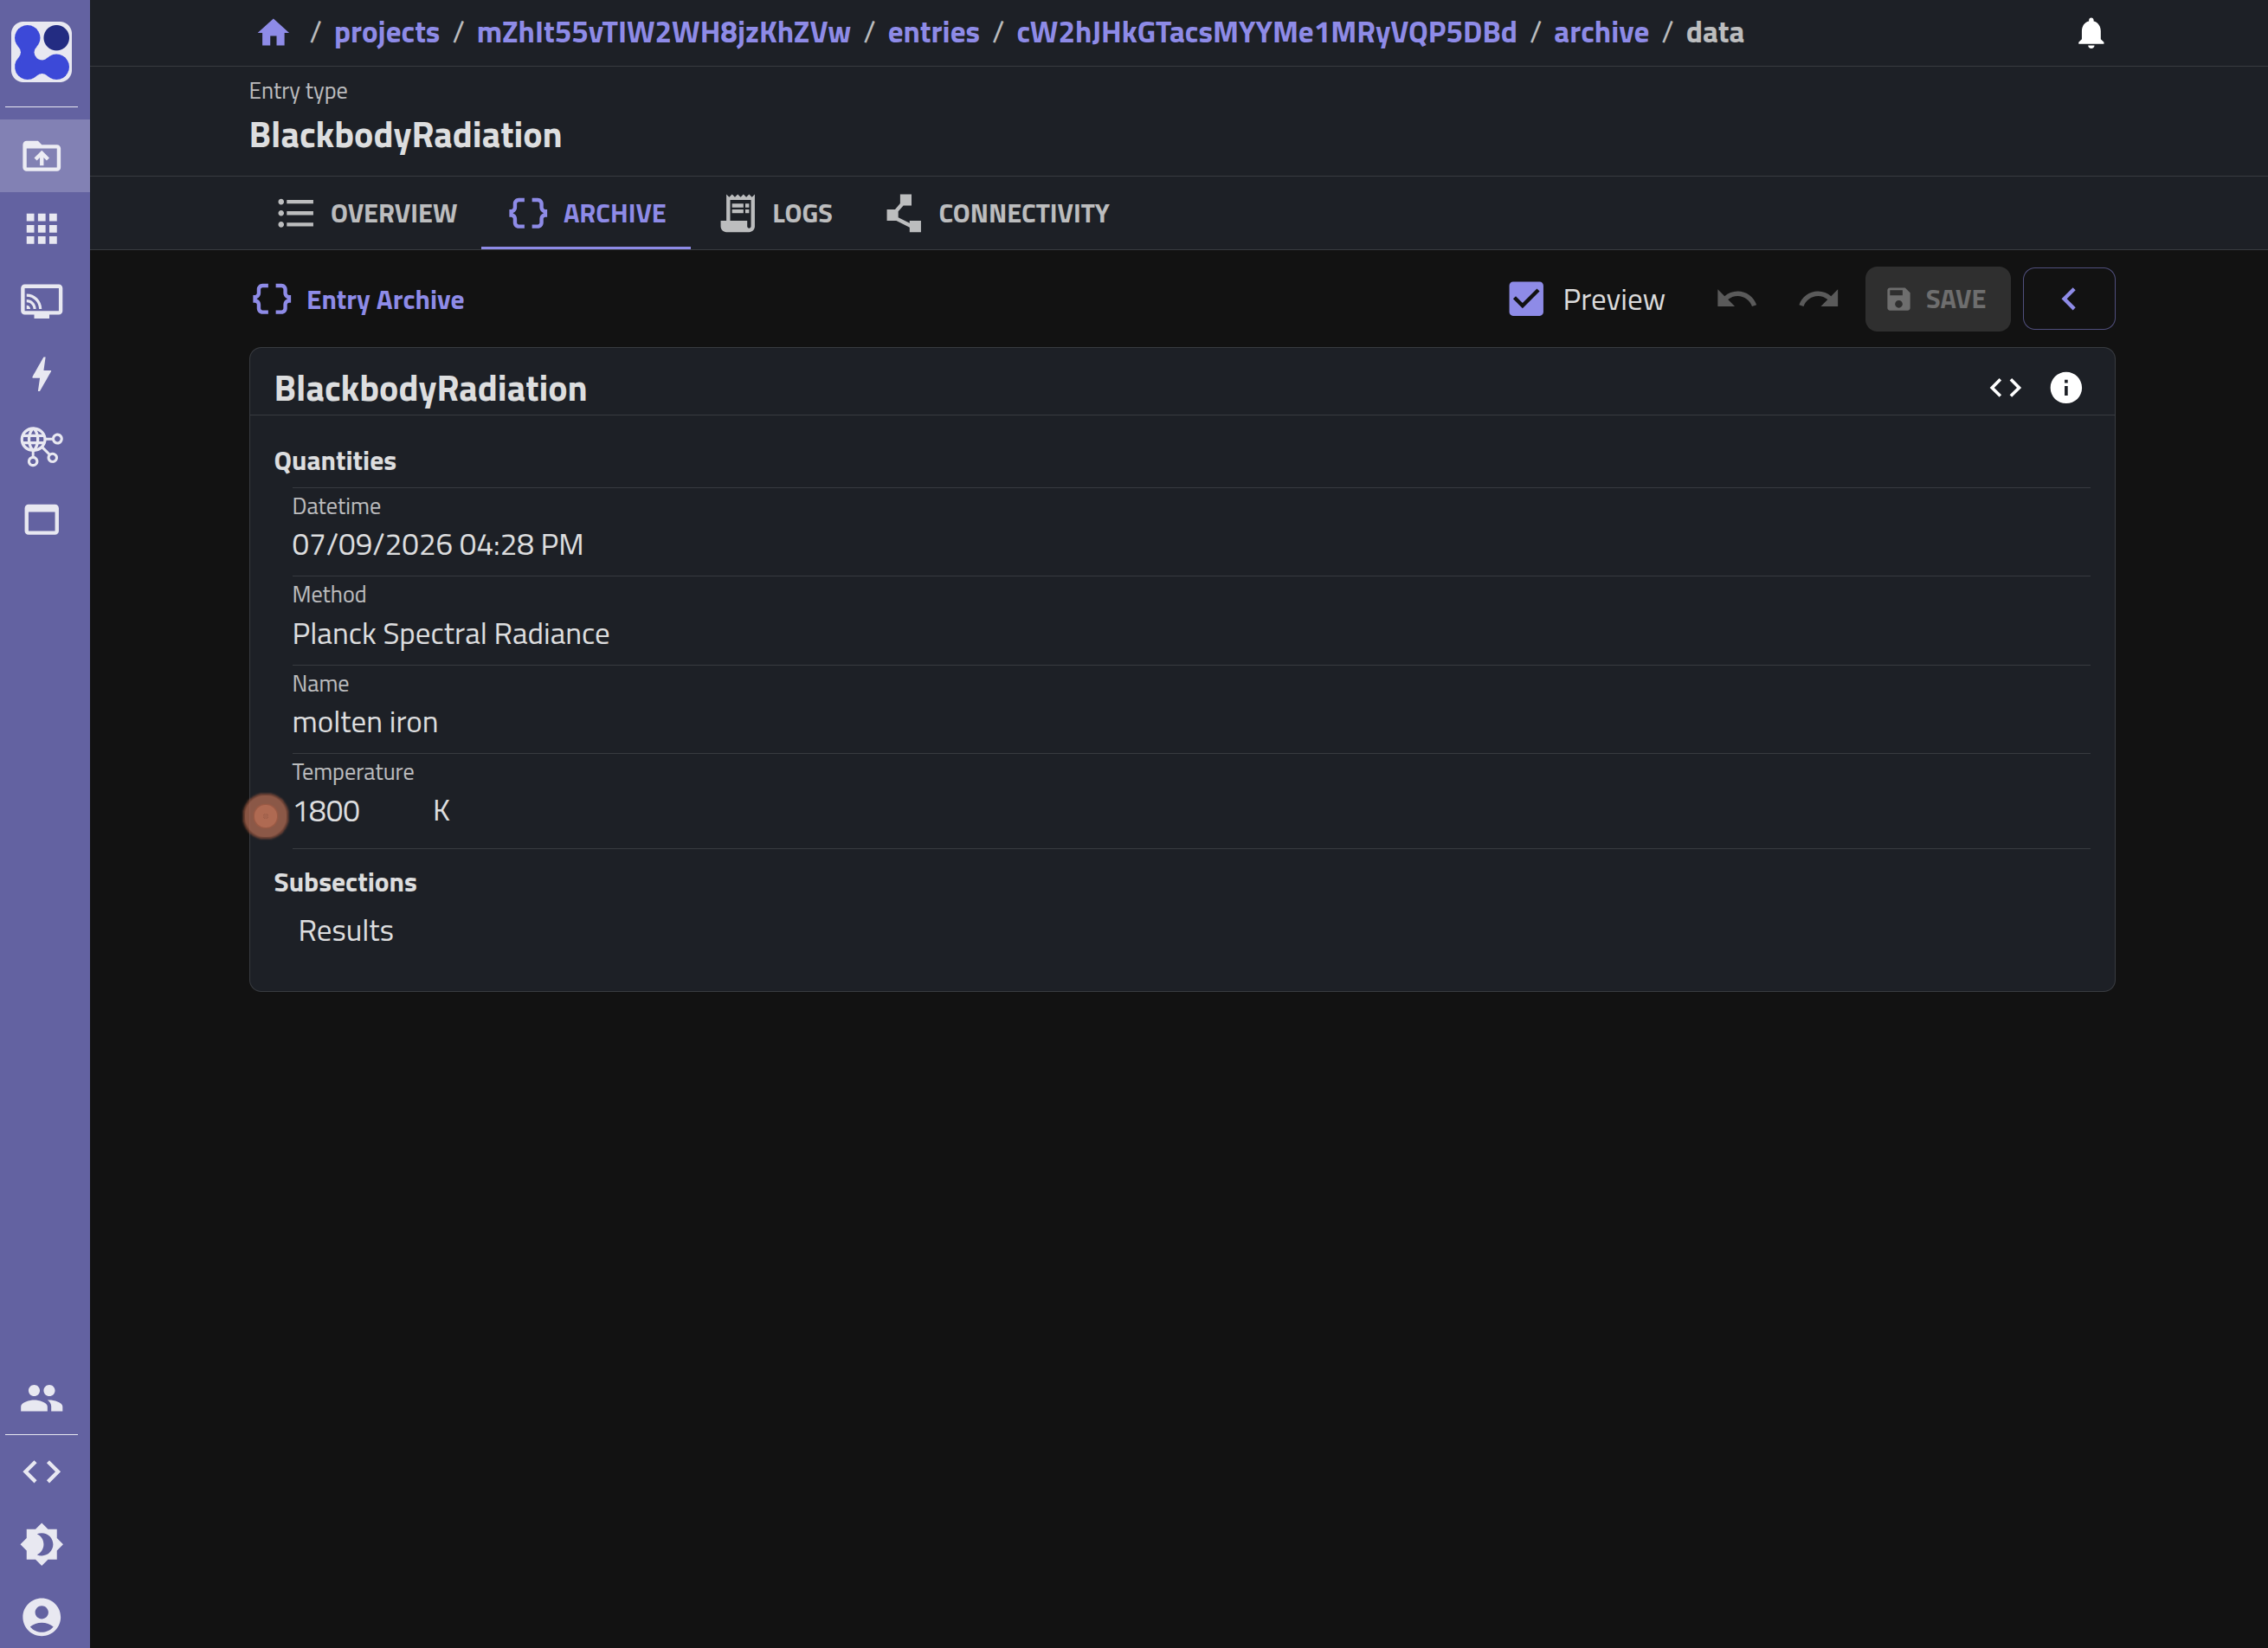
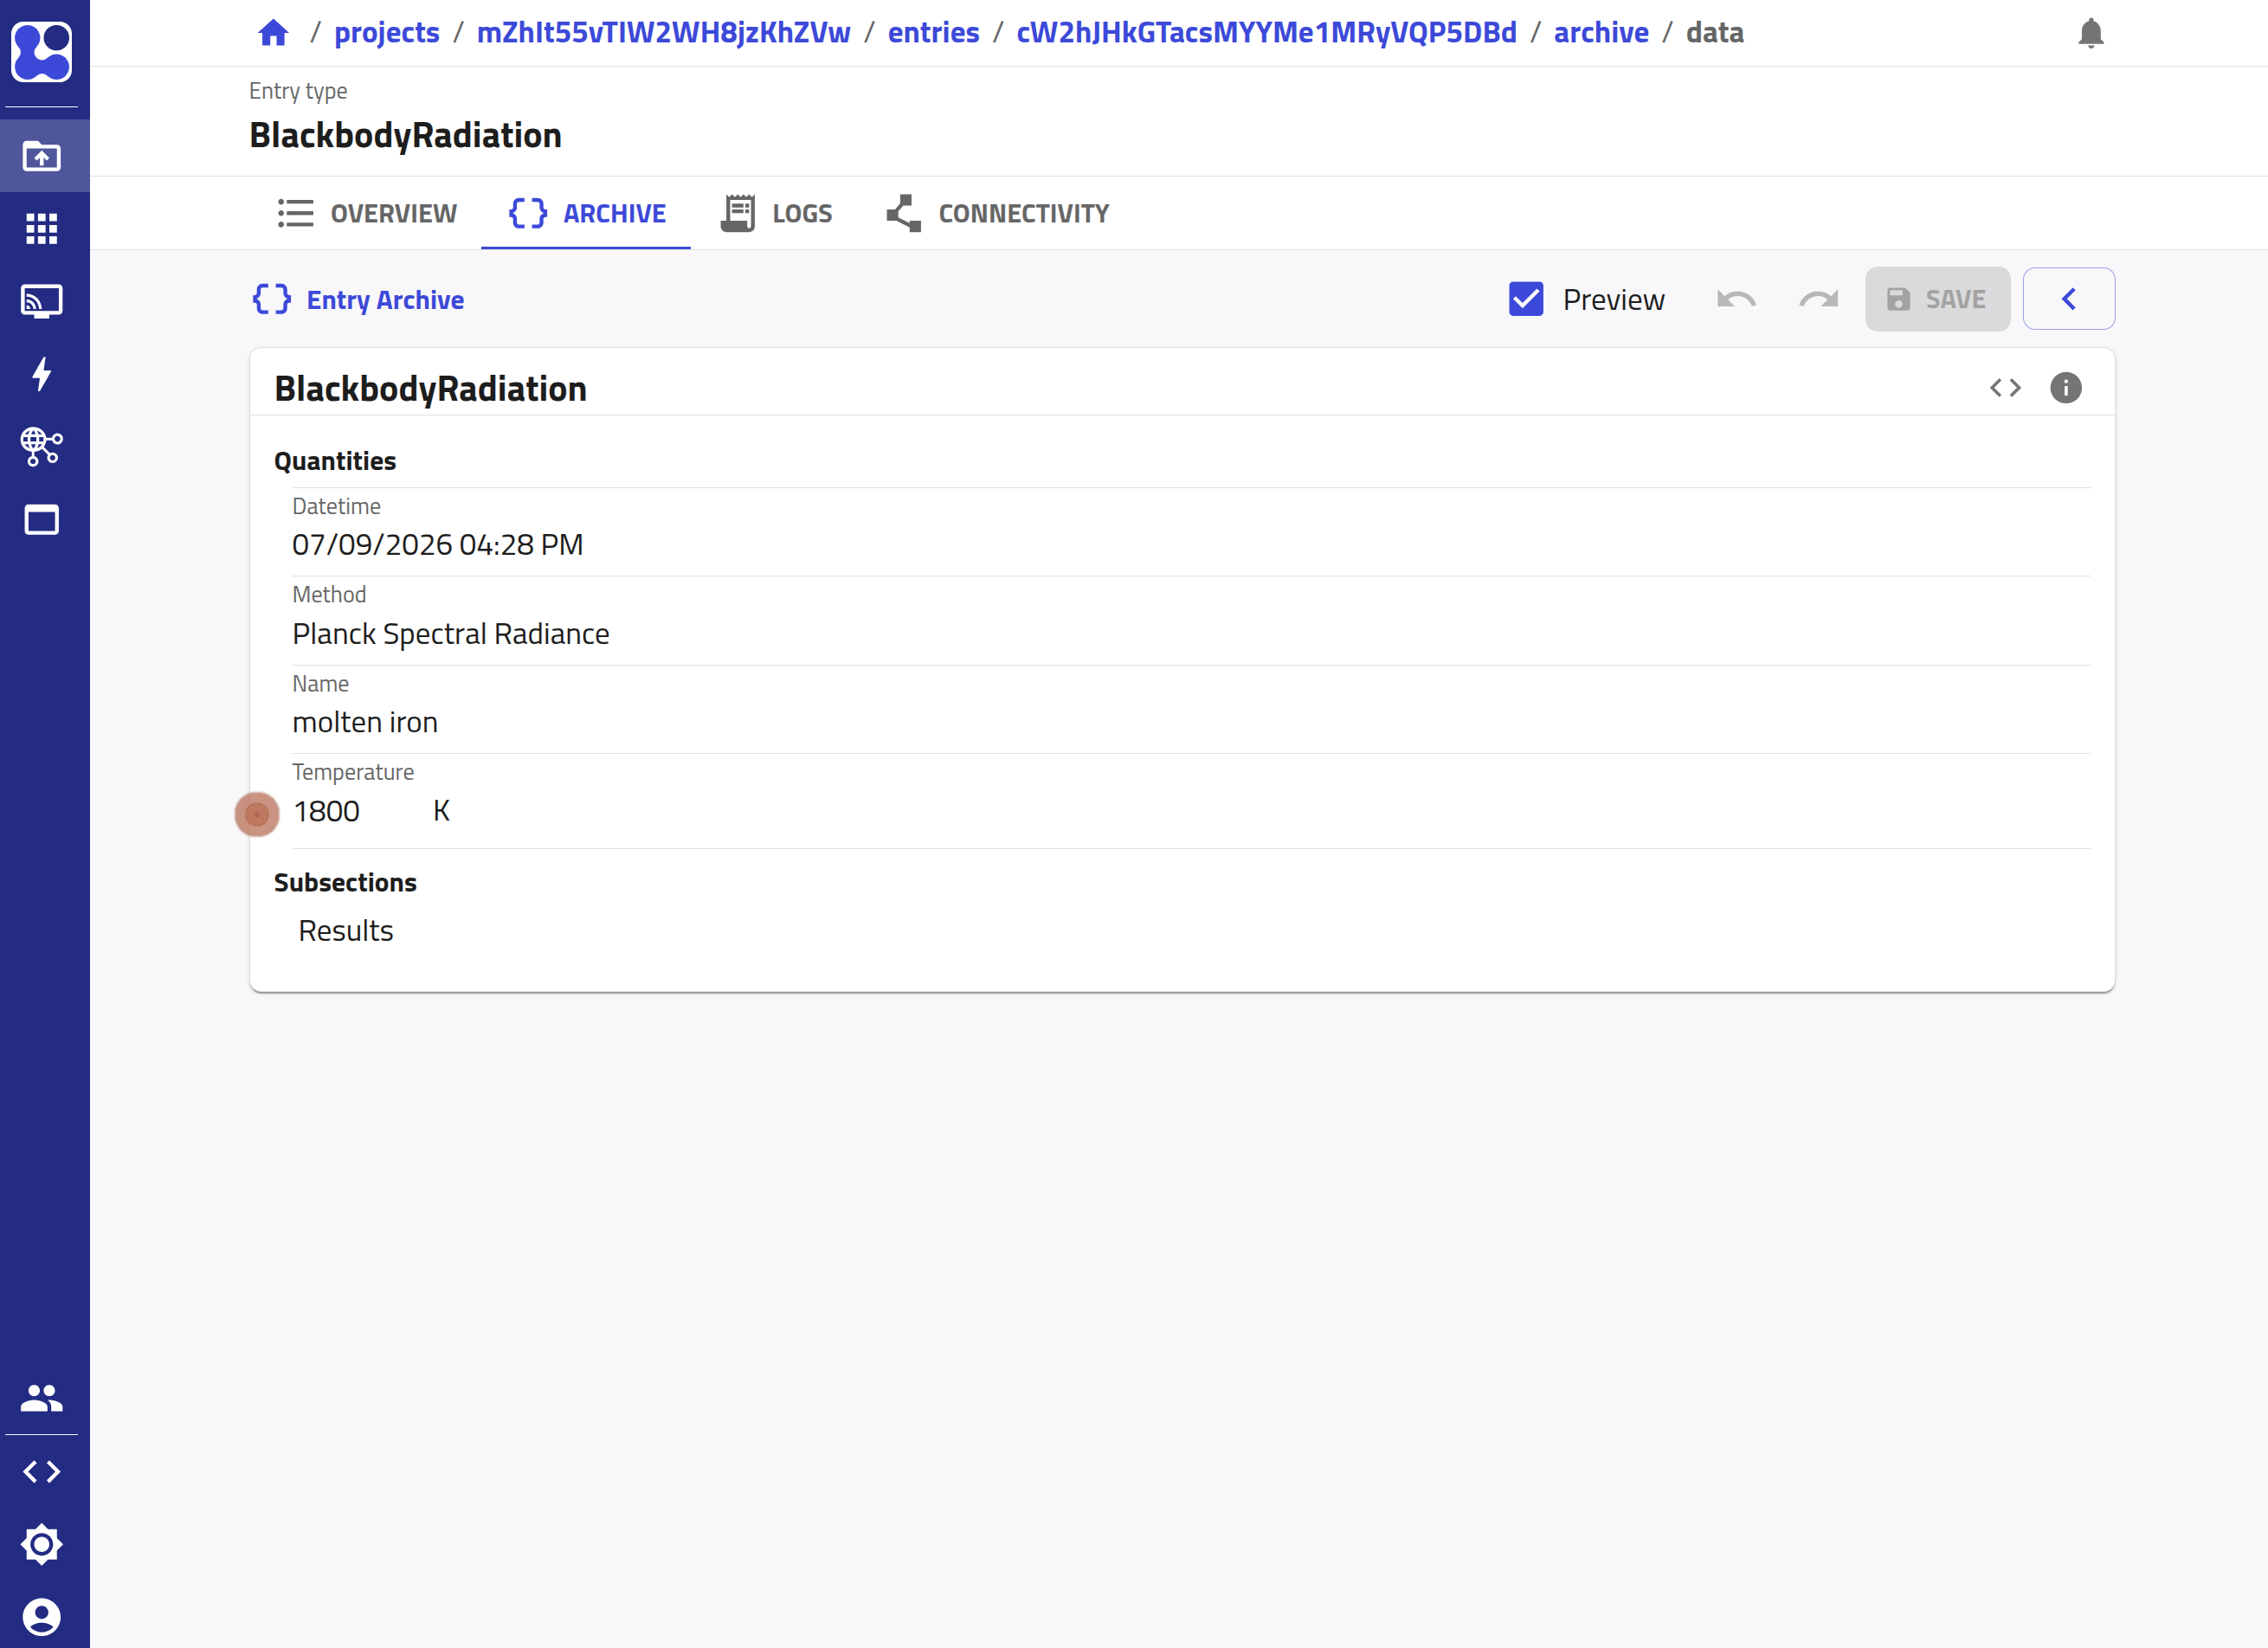
-
Save the entry, then go to the
Resultssection.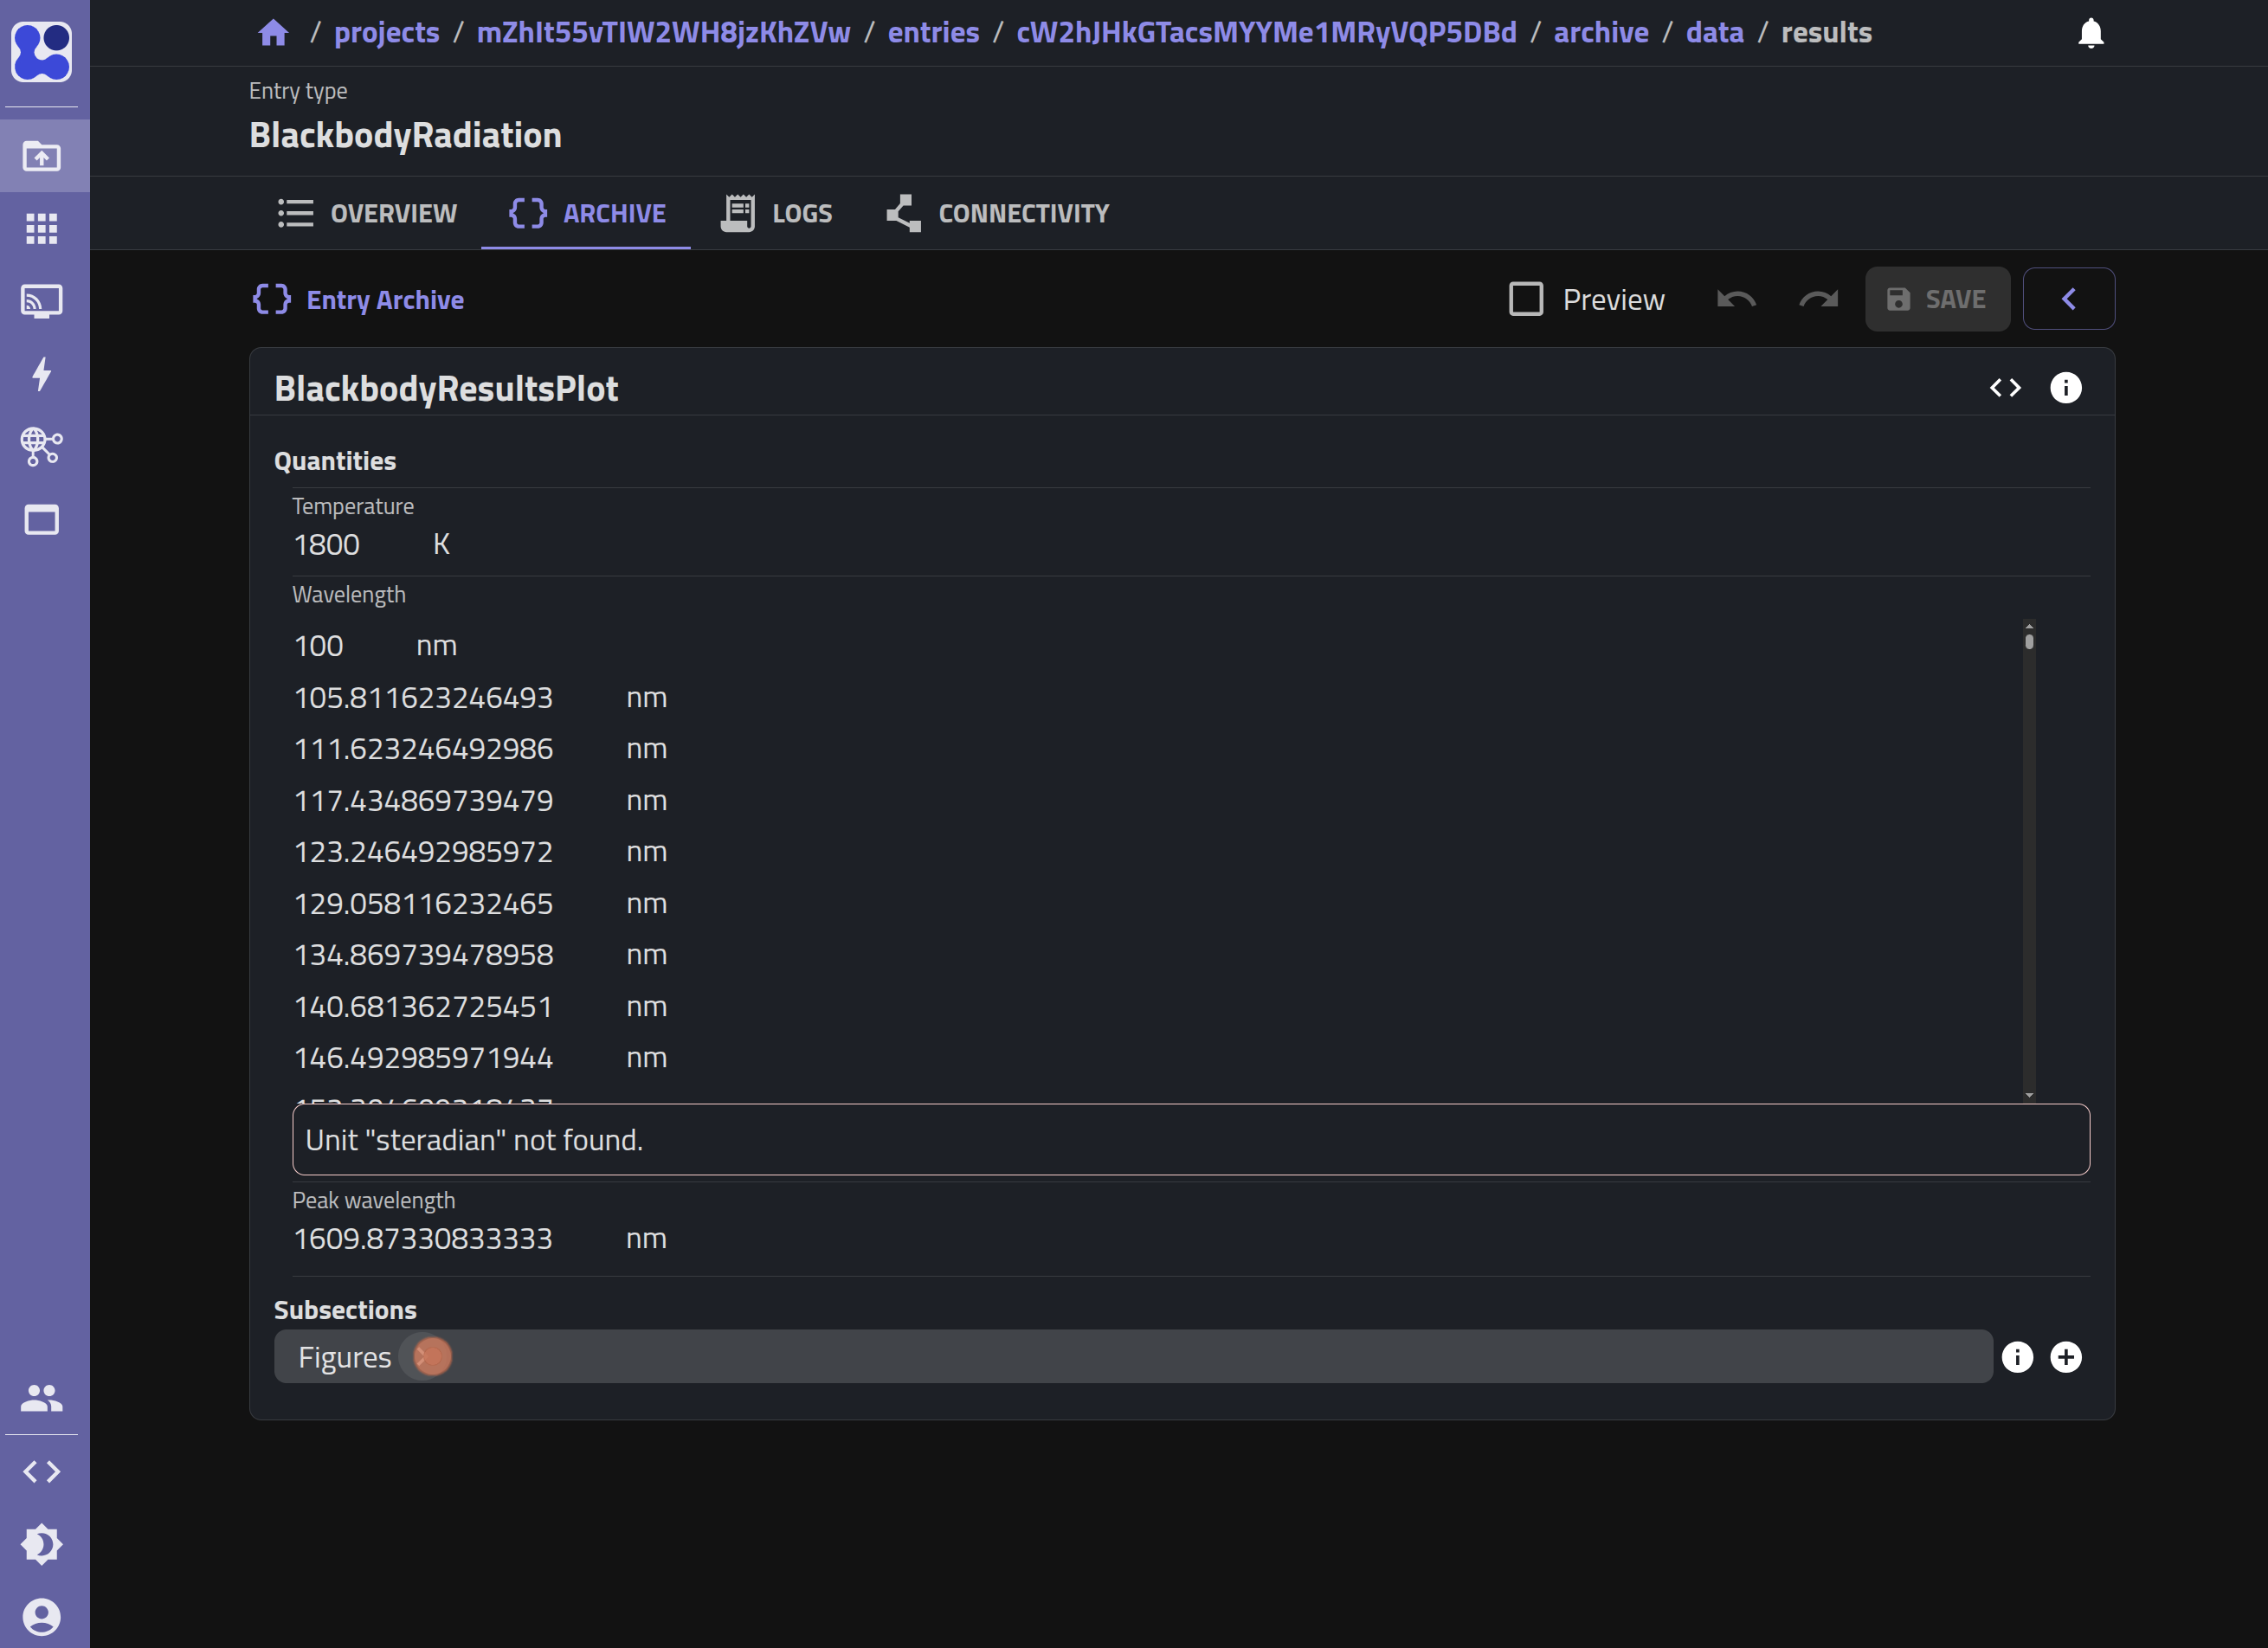
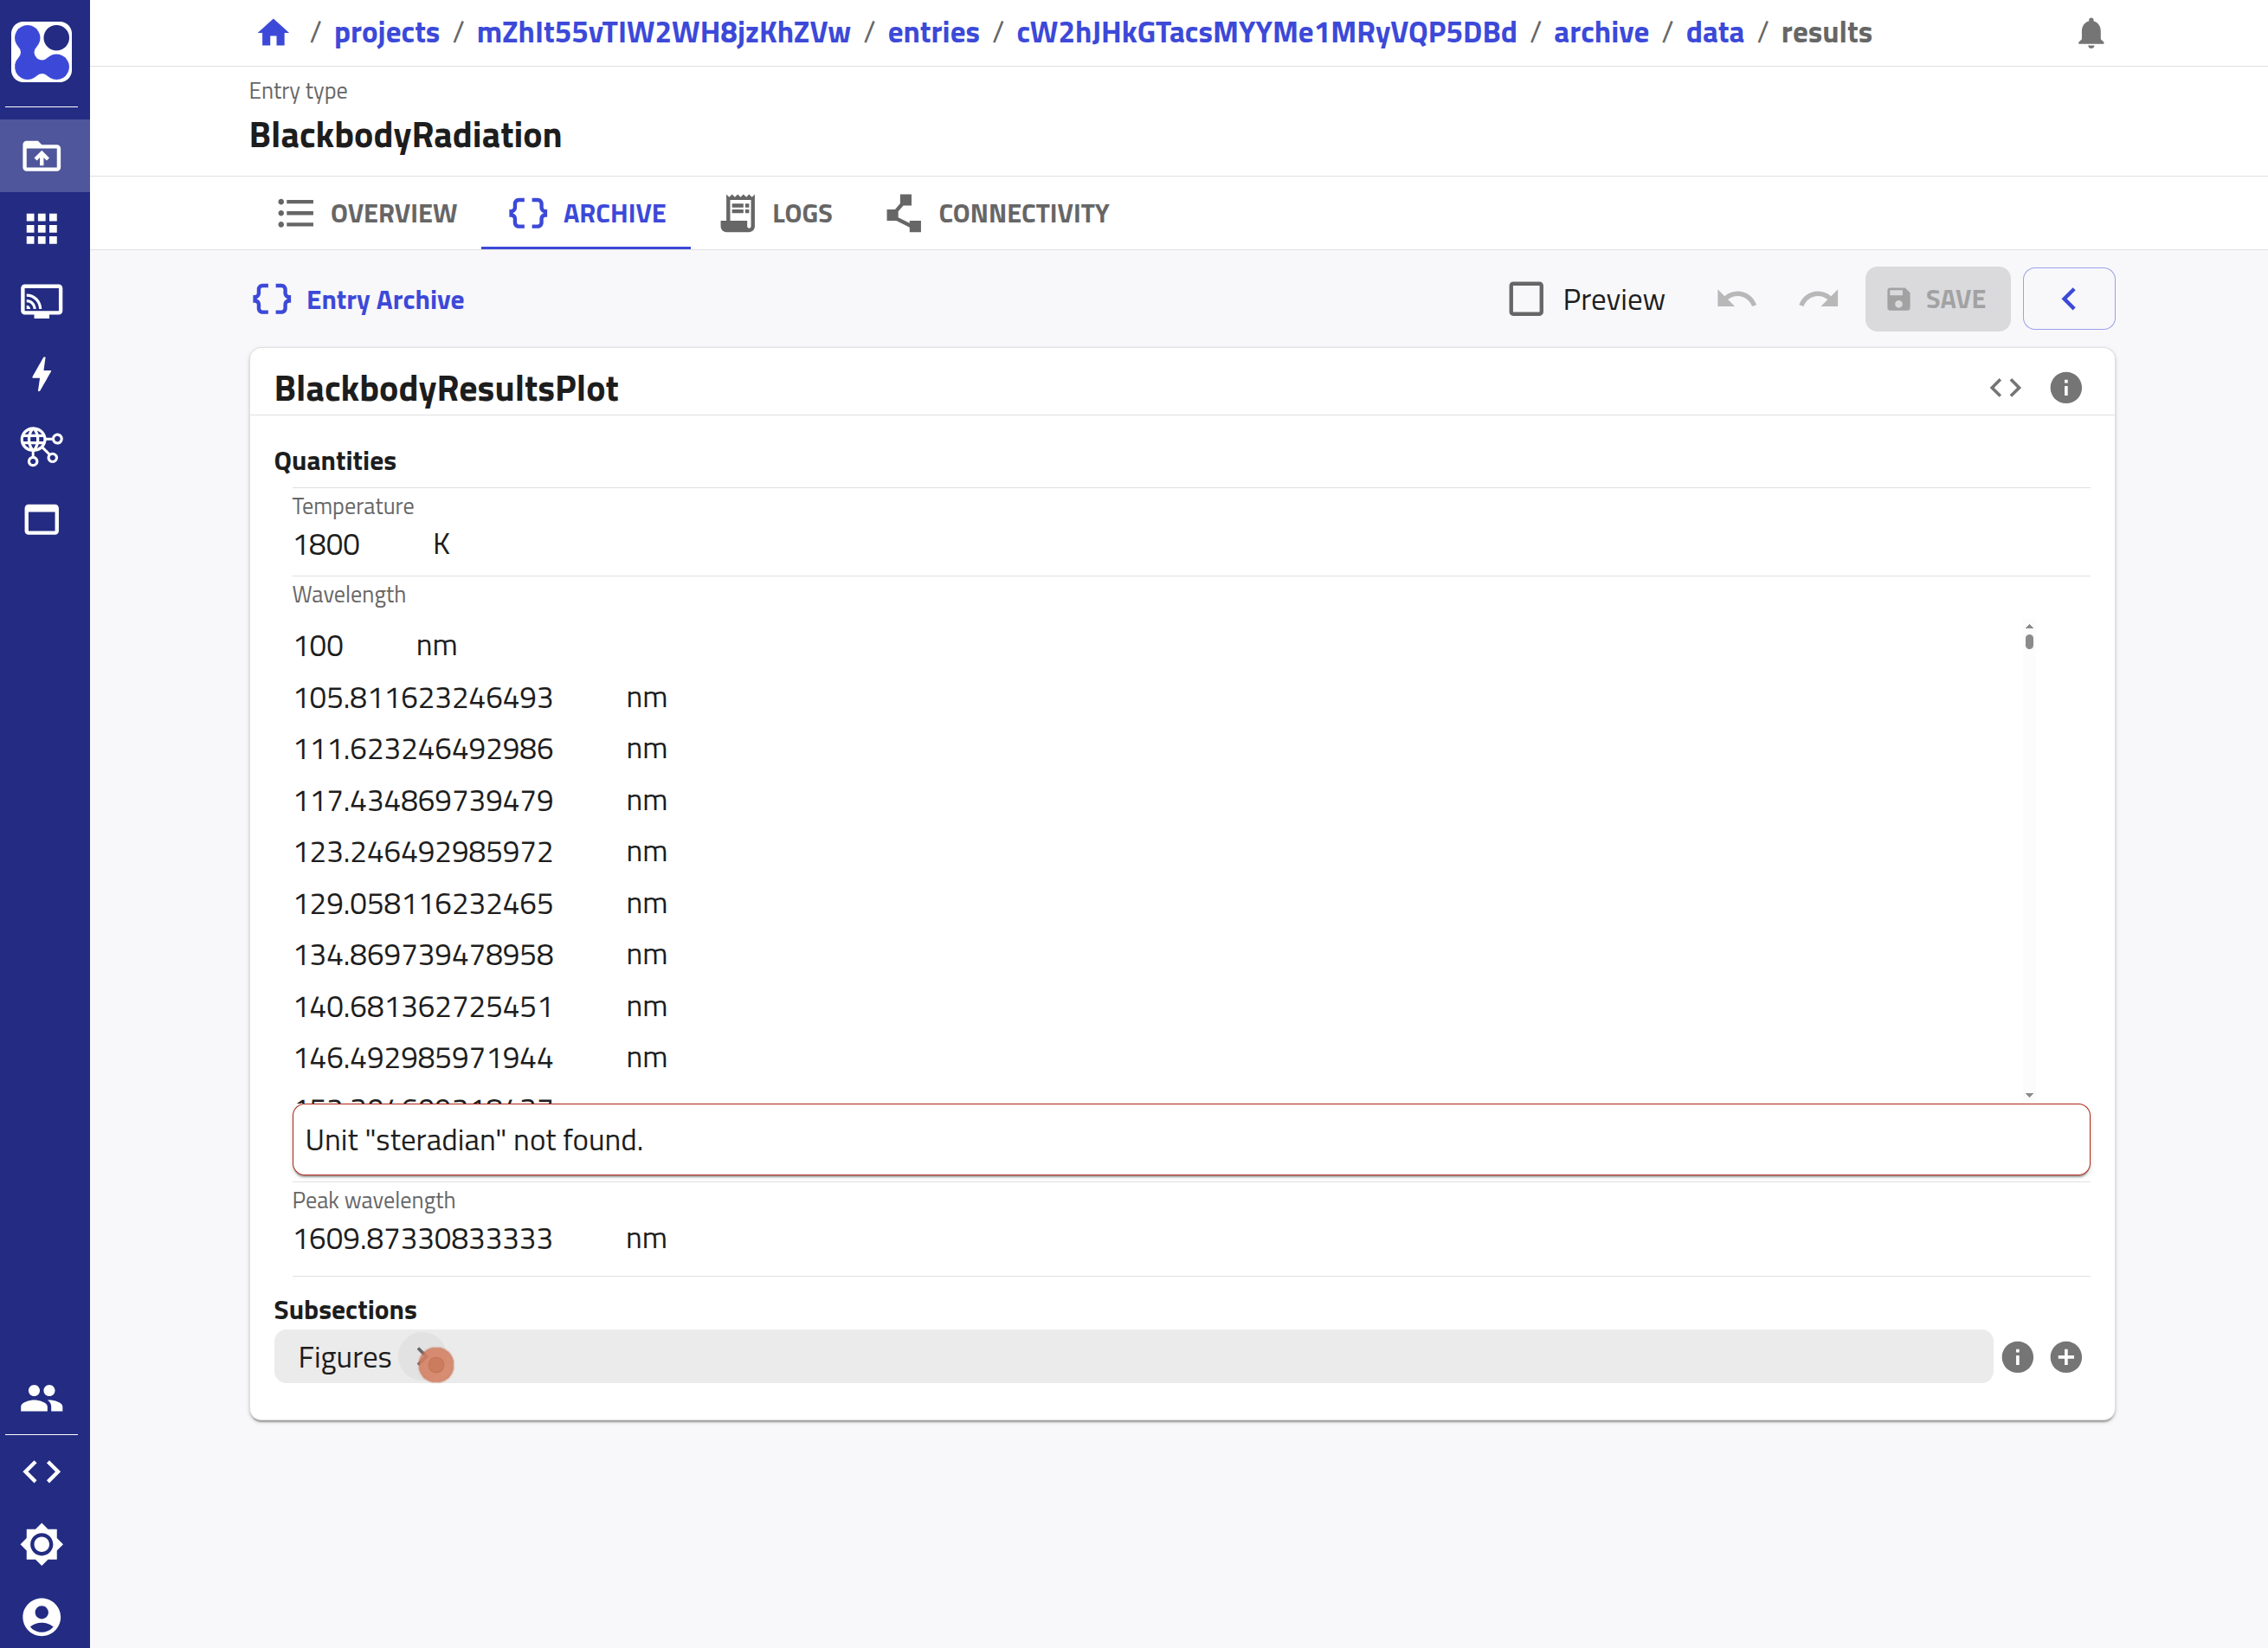
-
Open the
Figuressection to find the spectral radiance plot.